Blackboard Ultra Documents
Ensuring accessibility in your Blackboard Ultra documents is key to fostering an inclusive and user-friendly learning environment. Use the Accessibility Checklist for Blackboard Ultra to verify that your document meets the needs of all students.
Blackboard Ultra Content Editor
The Content Editor is Blackboard Ultra's text and media editing tool. Just like other authoring software, it allows content creators to add text, links, images, and other media— all of which must be made accessible to students. When creating documents using Blackboard Ultra's Content Editor, make sure that you adhere to the following accessibility best practices.
Headings are signposts that structure documents and allow readers to easily navigate documents.
Using the Text Style Icon to Apply Headings
In Blackboard Ultra’s Content Editor, use the Text Style icon to format your headings correctly:
- Title: Use this for the main heading of the document. Each Ultra document should have only one Title.
- Header: Use this for primary section headings under the Title.
- Subheader: Use this to divide sections into smaller, more manageable parts.
- Paragraph: All standard text should be formatted with the Paragraph style.
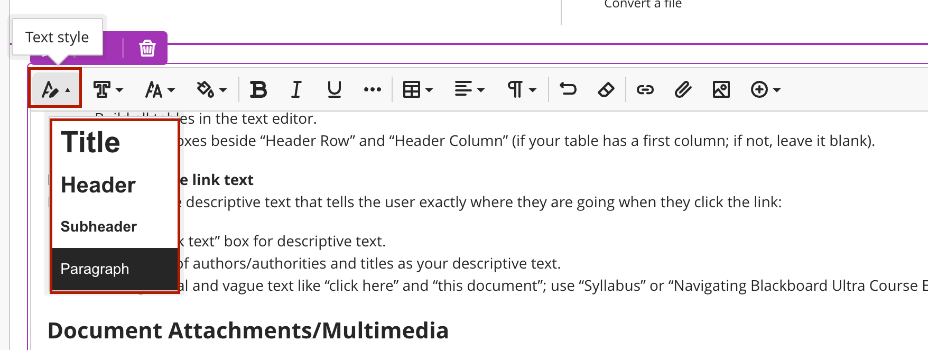
Steps for Applying Heading Levels
- Highlight the desired heading text.
- Select the Text Style icon in the toolbar.
- Choose the appropriate style (e.g., Title, Header, Subheader, and Paragraph).
Demonstration Video: Creating Accessible Headings in Blackboard Ultra
Watch a demonstration video on how to create an accessible and logical heading structure in your Blackboard Ultra documents.
When adding lists to your content, always use the built-in list styles provided in the Content Editor. Avoid manually formatting lists with numbers, symbols, or tabs, as this can create accessibility issues and disrupt screen reader navigation.
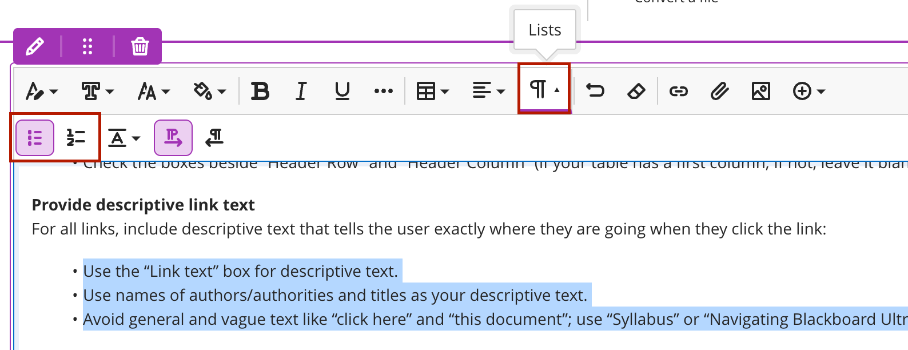
Steps for Applying Pre-Set List Styles
- Highlight the desired list text.
- Click the List button in the toolbar.
- Choose the Numbered List or Bulleted List option.
Demonstration Video: Creating Accessible Lists in Blackboard Ultra
Watch a demonstration video on how to create accessible lists in Blackboard Ultra.
To ensure accessibility, all meaningful content should meet the following contrast guidelines:
- Regular text: must have a contrast ratio of at least 4.5:1.
- Large text: (18 pt or larger, or 14 pt bold or larger) requires a minimum ratio of 3:1.
Use online contrast checkers like WebAIM to ensure compliance with accessibility standards.
The Content Editor has designated black text on a white background as the default for all text options. While instructors can customize text color using the Color Picker options, they must follow WCAG 2.1 AA color contrast guidelines.
- Recommended Colors: Blackboard’s Black and Purple options are the most accessible.
- Avoid: Red, Green, and Gray font colors, which may be difficult for some users to read, especially those with color vision deficiencies.

Steps for Editing Text and Background Color
- Highlight the desired text.
- Select the Color Picker tool.
- Choose from the pre-set colors.
Accessibility Tip: Avoid using color alone to convey emphasis. Screen reader users may not be aware when text is colored, and color-blind users might struggle to differentiate between colors. Use other methods of emphasis, such as bold or italics, in addition to color.
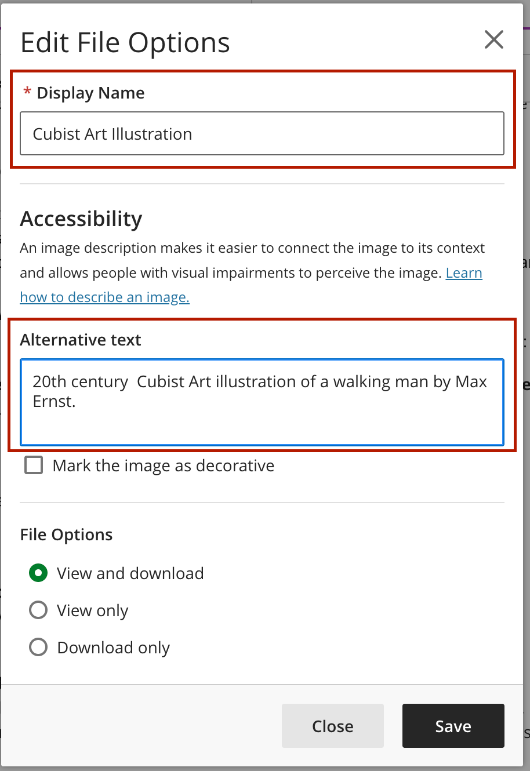
When adding images, always include Alternative Text and a Display Name. This ensures that users relying on screen readers can understand the content of visual elements—even if they can't see them.
Add Alternative Text and a Display Name to Images
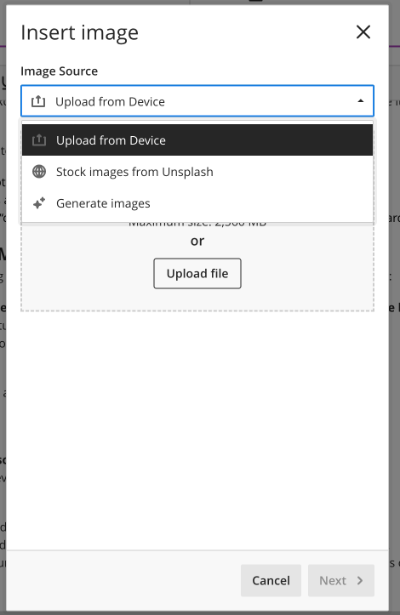
- Click the Image button in the Content Editor.
- Choose your image source: Upload, Stock Image, or Generate Image.
- Edit the image.
- Fill out the Alternative Text and Display Name boxes in the Edit File Options dialogue box.
-
Choose how students can interact with the image: View and Download, View only, or Download only.
-
Note: If an image is decorative, insert "not applicable," "n/a," or "null" for the alternative text.

Demonstration Video: Creating Accessible Images in Blackboard Ultra
Watch a demonstration video on how to make images accessible in your Blackboard Ultra documents.
Tutorial: Complex Images
Complex images require more detail than the Alternative Text field allows. To ensure accessibility for complex visuals such as maps, charts, and graphs, include a long description alongside the image.
For guidance on adding long descriptions in Blackboard, refer to the Complex Images in Blackboard Ultra tutorial.
When working with tables in the Content Editor, we want to create tables with accessibility in mind.
- Use tables for data only, not for layout purposes.
- Build all tables in Simple Syllabus. Do NOT embed tables as an image file.
- Use a simple table structure with a clearly marked header row.
- Avoid using blank, merged, and split cells. These can create issues for screen reader users, who may not be able to navigate the table in a logical reading order.
Steps for Adding a Table
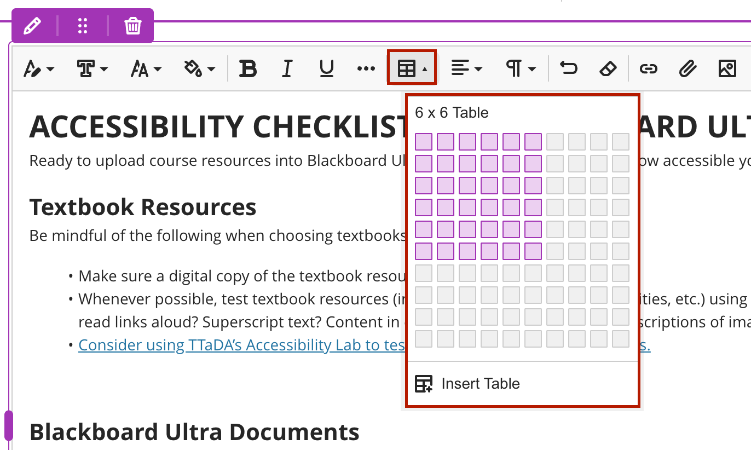
- Select the Create or Edit Table feature from the toolbar.
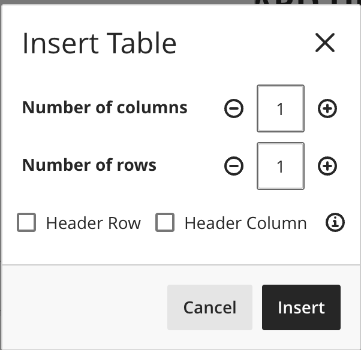
- Specify the dimensions of the table.
Setting a Header Row
A header row is the top row of a table that serves as a title for the categories of information in each column. Designers often manually bold this row to create emphasis, but it's important to mark headers properly in the code to ensure they are structurally identified. Screen readers depend on these structural headers to help users understand the table's organization and navigate its content accurately.
In the Content Editor, instructors can set the header row or first column by:
- Clicking into a cell in the desired header row or column.
- Selecting Header Row, Header Column, or both in the table menu.

Demonstration Video: Creating Accessible Tables in Blackboard Ultra
Watch a demonstration video on how to create accessible tables in Blackboard Ultra.
Write link text that clearly describes the link's purpose (think titles of webpages, names of organizations, etc.). This ensures all users can easily understand the destination of the link.
Steps for Applying Links
- Highlight the desired link text.
- Click the Link button in the toolbar.
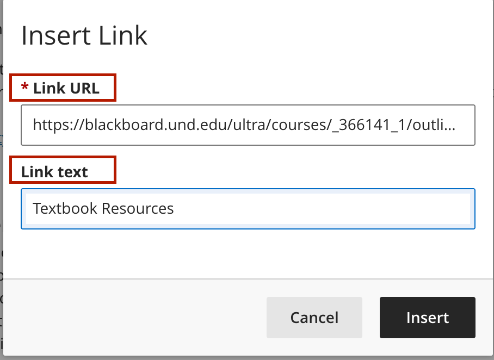
- Paste the full URL into the Link URL field.
- Edit the text in the Link Text field to ensure the link text is descriptive and meaningful.

Demonstration Video: Creating Accessible Links in Blackboard Ultra
Watch a demonstration video on how to create accessible links in Blackboard Ultra.
For detailed information about the features and functionality of the Content Editor, visit UND’s Knowledge Base article: Blackboard Content Editor.
Document Attachments
Ultra documents can include both content created using the Content Editor as well as content attached to the page. When adding attachments to your Ultra documents, we need to consider the following accessibility best practices.
When adding attachments or embedding multimedia in your Ultra document, ensure that you have checked the accessibility for all attached documents. Common things include heading structure, alt-text/long description for images, lists, tables, and links.
Note: Blackboard Ally cannot check the accessibility of Excel, video, or audio files. These must be reviewed manually.
For more help on making your attached documents accessible, consult the following resources:
Steps for Attaching Files to an Ultra Document
- Select the Edit Content button on the desired Ultra page.
- Click the plus (+) sign in the top-left corner.
- Choose your document source: File Upload, Cloud Storage, Content Collection, etc.
- After uploading your attachment, provide a descriptive Display Name for the file.
When adding video content to your Blackboard Ultra course, it is best to link to the video rather than uploading the video file directly.
Uploading large video files can:
- Significantly increase your course size.
- Lead to slower load times for course resource.
- Result in increased storage costs for UND and NDUS.
Media Best Practices
- Avoid uploading video files directly into Blackboard.
- Link to all video content
- Embed a video using Blackboard's Media tool.
- Link to a video through the YuJa CIM (Course Integration Module) tool.
- Add captions to your videos.
- Provide an accurate text transcript for all video and audio files.
Making PDFs accessible is a complex and resource-intensive process, requiring significant time, expertise, and finances. Before proceeding with remediation, consider alternative ways to share your content.
Alternatives may include:
-
Share content in its original file format (Word, PowerPoint, Excel, etc.). These file formats retain accessibility features.
-
Use Permalinks. If you've downloaded a PDF from the UND library system or another database, use a permalink. Permalinks offer an alternative to sharing inaccessible PDFs on your course page. Rather than uploading a copy of an inaccessible article, you can link learners directly to an article’s bibliographic record in a database.
-
Recreate the document if the original file is no longer available. In many cases, this is a faster and more accessible option than remediating a PDF.
Demonstration Video: Creating Permalinks
Watch a demonstration video on how to create permalinks in your Blackboard Ultra course.
Tutorial: PDF Workarounds - Permalinks
For detailed instructions on finding and creating a permalink, refer to the PDF Workarounds: Permalinks tutorial.
On Demand Training
The Teaching Transformation and Development Academy offers a range of pre-recorded workshops to support your accessibility efforts. For focused guidance on Accessibility in Blackboard Ultra, visit the Creating Accessible Content section under Recorded Sessions.
Blackboard Ultra Accessibility