Removing outdated or irrelevant content enhances the user experience by ensuring that only essential and accurate information is presented. This is especially important for screen reader users, as it prevents them from spending time on content that is no longer relevant.
PDF Accessibility
What are PDFs? | PDF Creation | PDF Remediation | Resources
What are PDFs?
PDFs, or Portable Document Format files, are designed to preserve the layout, formatting, and content of a document across different devices and platforms. They are commonly used because they ensure consistent presentation of content such as text, images, links, and forms.
Limitation of PDFs
While PDFs ensure a consistent appearance across different software and platforms, they can create significant challenges for people with disabilities—especially those using assistive devices like screen readers. Making a PDF accessible, a process known as PDF remediation, requires substantial resources.
- Technical Expertise: There is a steep learning curve in PDF remediation, as it requires specialized knowledge.
- Time: The time it takes to remediate a PDF varies depending on the document's complexity, the user’s expertise, and the chosen software.
- Cost: Remediation software can be expensive, and outsourcing the process to a professional service may be just as costly.
Should I use a PDF?
Before converting your content into a PDF and sharing it with students, you should ask the following 3 questions:
If you have the time, expertise, patience, and financial resources to remediate your PDF, you are welcome to do so. However, please note that UND does not currently have an enterprise license for PDF remediation. You may need to check with your department or college to see if they have access to remediation tools.
PDF Creation
Accessible PDFs benefit all users from a Universal Design (UD) perspective. PDFs that have been made accessible are easier to navigate, are searchable, and can be accessed by text-to-speech (TTS) or screen reader software. Accessible PDFs can also reduce the need for student accommodation requests. Students who rely on assistive technologies like NVDA or JAWS to access course materials will be able to engage with their readings more easily. By proactively fixing your PDFs, students are less likely to request alternative format accommodations from Student Disability Resources.
PDF Generation
When determining the best approach to PDF remediation, it’s important to consider how the PDF was created. There are two primary methods:
- Exporting a document as a PDF: This method retains the text, structure, and formatting of the original document.
- Scanning a document in as a PDF: This method creates an image-based file, which lacks readable text and other accessibility features.
Exported PDFs
Creating an accessible PDF is always easiest when you have access to the original file. Prior to remediating an exported PDF, follow these steps:
Making changes to a PDF is challenging and often requires additional training. Whenever possible, return to the source document to fix any issues before converting it to a PDF.
Follow the accessibility action steps for each content type (Microsoft Word, Excel, and PowerPoint) before converting these documents to PDFs.
Run the built-in Accessibility Checker to test for accessibility issues. This checker scans your document for potential issues that might prevent people with disabilities from accessing the content properly. It will highlight the issues, provide suggestions on how to fix them, and then prompt you to fix these issues. For more information, see Microsoft's Support documentation on Improving Accessibility with the Accessibility Checker.
There are several ways to convert Microsoft Documents to a PDF, but not all ways preserve the accessibility of the original document in PDF form. Moreover, not all file types support accessible conversions. At this time, converting PowerPoint documents to accessible, tagged PDFs is not available. If you choose to export PowerPoint documents to PDFs, they must be fully remediated using Acrobat Pro DC.
To preserve the accessibility of the original document, follow the instructions outlined in the tutorials below.
Scanned-In PDFs
When content creators scan a printed page into a PDF, the resulting file contains no recognizable text—only an image of the text. You can identify an image-only PDF if the text cannot be selected or searched within the document. For screen readers, these PDFs are treated as images rather than text. While a single image can be made accessible with a brief alt-text description, this approach is not feasible for an entire scanned PDF, regardless of its length.
When considering uploading a document as a scanned-in PDF, it's important to take the following steps to ensure accessibility:
If possible, locate digital alternatives to your scanned-in PDF. Publicly accessed digital versions are more likely to have built-in accessibility features. Consider accessing digital alternatives from the following locations:
- Download a PDF version from the library system.
- Download a PDF version from the Publisher
- Download a PDF version from research databases.
If you intend to scan-in a document, the original print copy must be clean and clear. Without a clean copy, OCR technology may miss valuable information in the scanning process.
- Remove handwriting, underlines, notations, and doodles.
- Ensure there are no colored highlights.
- Check for cut-off lines.
- Check for blurred text.
- Scan pages in the right orientation—portrait preferred.
- Scan pages individually; only one page of text should be visible per page.
Example: a decent scanned-in PDF.
The first step in making a scanned-in PDF accessible is to convert the image to text using optical character recognition (OCR) technology. OCRing a document essentially turns the flat image of a scanned-in PDF into searchable and editable text. You will know a PDF has been OCR'd if you can select the text in the document. While OCRing a document makes it readable to screen reader users, it does not fix any of the other problems of a scanned-in PDF, such as incorrect or missing tag structure, missing headings, etc.
Using OCR technology requires special software and programs, such as Adobe Acrobat Pro. These programs can be costly, so you may not be able to access these programs. If you don't have access to these programs, one alternative is to upload your scanned document into Blackboard. Blackboard Ally can automatically generate alternative file formats—including OCR'd PDFs. For more information, check out Blackboard's tutorial on how to OCR Documents Using Ally.
Introduction to Scanned in PDFs
PDF Remediation
Once your document has been converted into a PDF, you can start the remediation process using Adobe Acrobat Pro. For guidance on how to work with PDFs in Adobe Acrobat, review these steps:
All PDFs should have the title and language set in Document Properties. The title should be concise and meaningful, reflecting the document's purpose. The title can be used to quickly identify the intent of a document without opening it. Meanwhile, the document language indicates the spoken language in which the text is written. Correctly set language properties allow screen readers and assistive technologies to accurately read and interpret the content.
Add Metadata
A document's title and language is part of its metadata. Metadata is the descriptive information embedded within a PDF file that helps identify and organize the document. This data is not visible to the eye; rather, it is contained within the code. Additional metadata includes the author's name, a subject description, and keywords. This metadata helps users and systems quickly locate the document in a library, database, or search engine by matching the keywords to search queries. In Adobe Acrobat, this additional data can be entered in the same dialogue box as the document title.
Some PDF security settings may prevent screen reader users from accessing accessibility features. Check your security permissions in Document Properties to ensure that “Protected View” and “Enhanced Security” is disabled. For most documents, the "No Security" option is preferred.

If your document contains images, they must first be tagged as figures. Once an image has been tagged, you can add alternative text from the Accessibility Tool bar.
- Select Prepare for Accessibility from the Tools menu.
- Select Add Alternate Text from the Accessibility toolbar.
- Add a clear description in the Text field box.


Tagging PDFs is crucial for document accessibility. Document tags provide an underlying formatting structure that defines the document's layout and enables screen readers to navigate the content more effectively. These tags make it possible for screen readers to identify elements such as headings, lists, tables, etc.
Inspect the Tag Tree
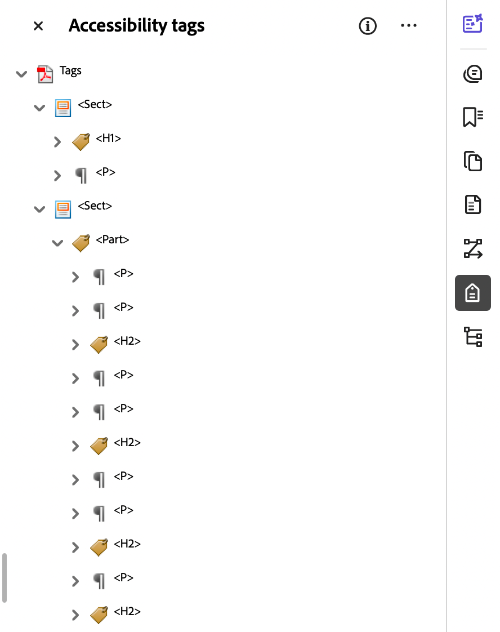
Accessible documents that have been correctly exported as a PDF will contain an existing tag tree. The HTML code created when applying styles in Microsoft Word, PowerPoint, and InDesign translates to tags in Adobe Acrobat. While the tag tree should reflect the content's structure, always inspect it to ensure proper tagging.
To view the tag tree:
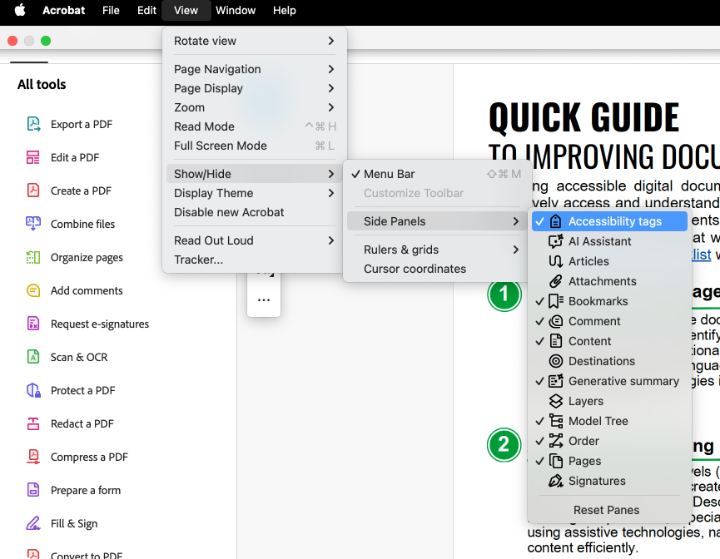
- Navigate to the hamburger Menu (Windows) or the View menu (Mac).
- Hover over the Show/Hide option; a new menu should appear.
- Hover over the Side Panels option; a list of tools should appear.
- Select Tags. This will display the document's tags in order from top to bottom.
- Review all tags to ensure proper semantic structure and reading order.
Delete empty Tags
Keep tag trees clean by deleting empty tags. Screen readers will read all tags, even those without content. This can cause unnecessary confusion in navigation.
Common PDF Tags
Container / Group Tags
Container tags help group other tags. These tags are not required, but they can be
useful in organizing page structure and improving document navigation. All container
and group tags exist under the <Document> tag.
| Tag | Name | Purpose | Image |
|---|---|---|---|
| <Document> | Document | Main document tag under which all tags are nested |  |
| <Part> | Part | Divides the document into major sections (e.g., chapter or report) |  |
| <Sect> | Section | Divides parts of a document into groups |
|

Text Tags
Text tags designate text elements utilized in the body of the document. They define and structure document elements, creating hierarchy and improving content readability and navigation.
| Tag | Name | Purpose | Image |
|---|---|---|---|
| <H1> | Heading 1 | A document's title |  |
| <H2> | Heading 2 | Main level heading |  |
| <H3> - <H6> | Heading 3 - Heading 6 | Subheadings |  |
| <P> | Paragraph | Body text |  |
| <BlockQuote> | Quote | Quote contained in its own paragraph |  |
| <L> | List | Tag under which all list items are nested |  |
| <LI> | List Item | Contains list item elements <Lbl> and <LBody> |  |
| <Lbl> | Label | The number or bullet character associated with a list item |  |
| <LBody> | Label Body | Text associated with a list item |  |
| <Link> | Hyperlink | Link to a webpage or document |  |
| <OBJR> | Object Reference | Nested under a <Link> tag; it is the active URL link |  |
| <TOC> | Table of Contents | Tag under which all Table of Contents entries are nested |  |
| <TOCI> | TOC Item | Entry within a table of contents; it houses the <Reference> and <Link> tags. |  |
| <Reference> | Reference | Internal link (e.g., footnote or TOC) |  |
Table Tags
Table tags are structural elements specific to creating tables. While tables exist in the body of a document and contain text elements, they are distinct from the body text. Table tags are used to define table structure, creating the grid-like layout we see here.
| Tag | Name | Purpose | Image |
|---|---|---|---|
| <Table> | Table | Tag under which all table tags are nested |  |
| <TR> | Table Row | Groups items in a table row |  |
| <TH> | Table Header | Heading cells within a row |  |
| <TD> | Table Data | Data cells with a row |  |
Figure Tags
Figure tags contain all image-related content. Therefore, all figure tags should have descriptive alternative text embedded into the tag. Images tagged as <Artifact> will have no place to input alternative text.
| Tag | Name | Purpose | Image |
|---|---|---|---|
| <Figure> | Figure | Photo or graphic (e.g., logo, illustration, photo, map, chart, etc.) |  |
| <Formula> | Formula | Mathematical formula |  |
Reading order and tag structure are closely related. A document's reading order is the sequence in which content tags are read. A correct tag tree ensures a logical reading order, which is crucial for screen readers and assistive technology. Ensuring the correct reading order prevents potential confusion, as the visual layout may not always match the intended reading order. Complex layouts, particularly those with tables or multi-column designs, can disrupt the intended reading order. For more information, see Adobe Support's documentation on Reading Order.
Run the Accessibility Checker to test for accessibility issues. This checker verifies if your document conforms to prevailing accessibility standards, such as PDF/UA and WCAG 2.0. It will prompt you to fix any issues it finds. Running the Accessibility Checker should be both the first and last thing you do in a PDF. For more information, see Adobe Support's documentation on Verifying PDF Accessibility.
Tutorials for Tagging in Adobe Acrobat
Tagging in Adobe Acrobat can be challenging, but it is essential for making PDFs accessible. Below is a starting point to help you understand the basics of tagging.
For additional guidance, consider watching video tutorials that demonstrate tagging techniques step by step. These resources can provide visual examples of how to properly tag elements such as headings, paragraphs, lists, and images.
Adobe Acrobat allows you to customize the side panel menu to view your frequently used tools.
Add Tags Window to Side Menu
- Navigate to the View menu.
- Select (Windows) or hover over (mac) the Show/Hide option; A sub-menu should appear.
- Select or hover over Side Panels. A second sub-menu should appear.
- Select Accessibility Tags.
The Tags window should now show in your side panel menu on the right side of the screen. Tags will be displayed in order from top to bottom. Review all tags to ensure proper semantic structure and reading order.
Change an Existing Tag
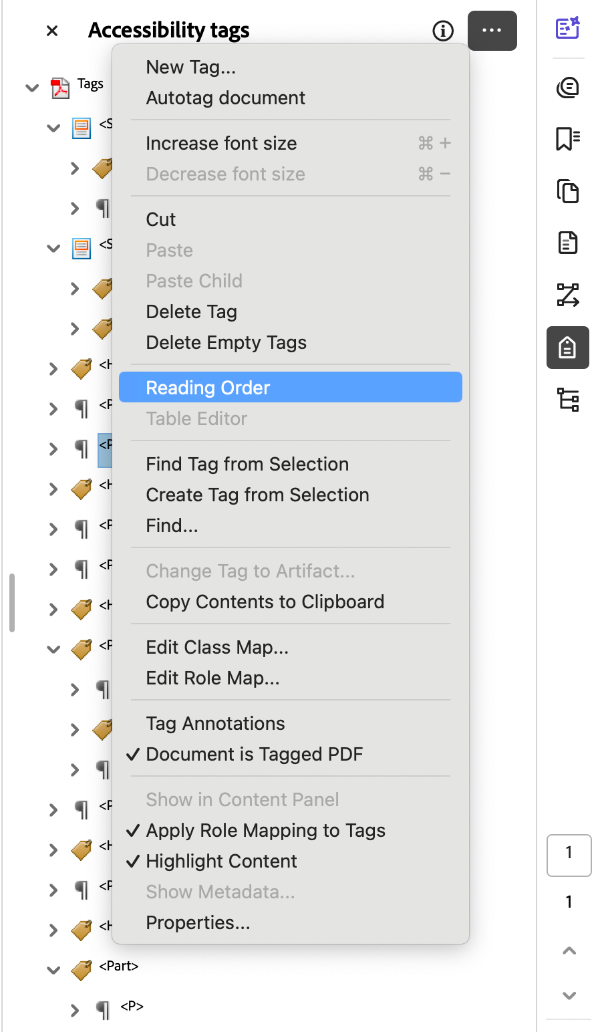
- Open the Tags window in the Side Panel menu.
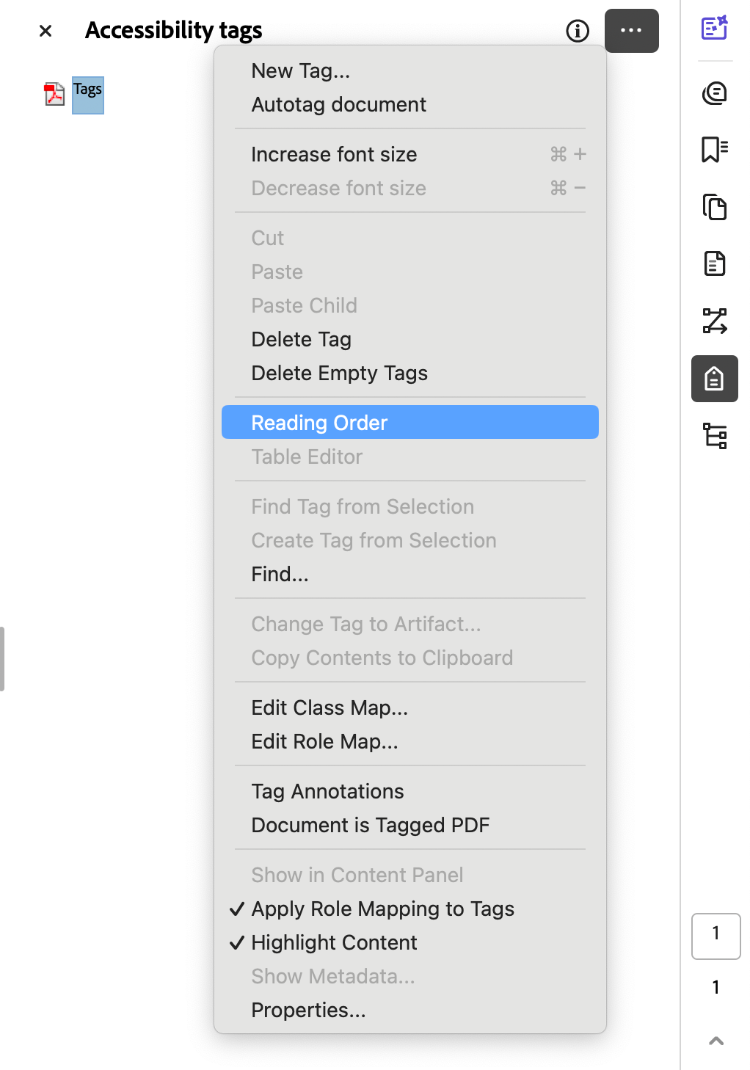
- Navigate to the three dots in the corner of your Tags window, indicating menu options.
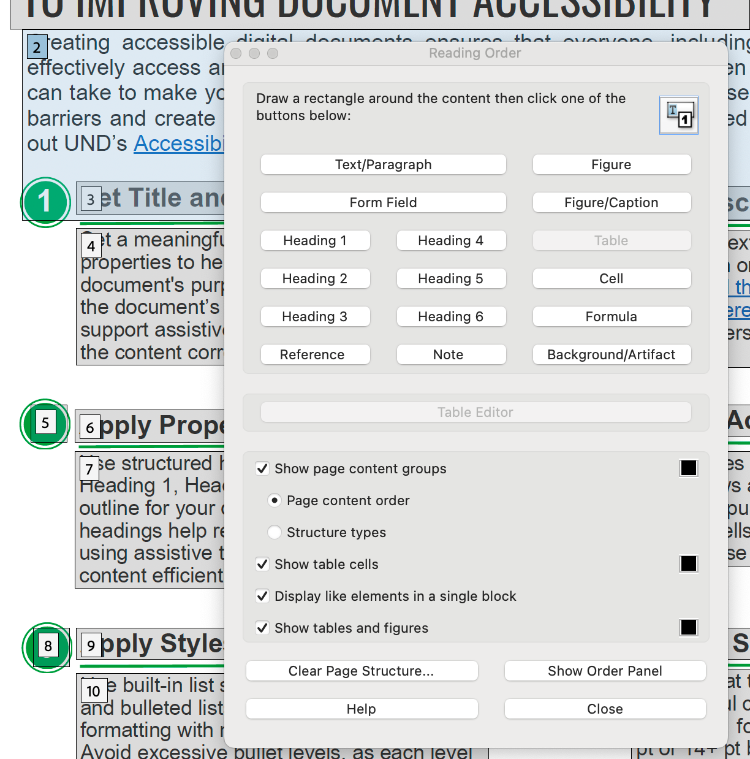
- Select Reading Order. The Reading Order tool dialogue box should open. In this box, you can designate content tags. Correctly designating tags creates a logical reading order.
- Click on the content box you would like to change.
- Select a new tag.

Drag and Drop
- Open the Tags window in the Side Panel menu.
- Select the tag you would like to move.
- Drag and drop the tag. As you drag the tag, a black line will appear. This line indicates places you may drop the tag.
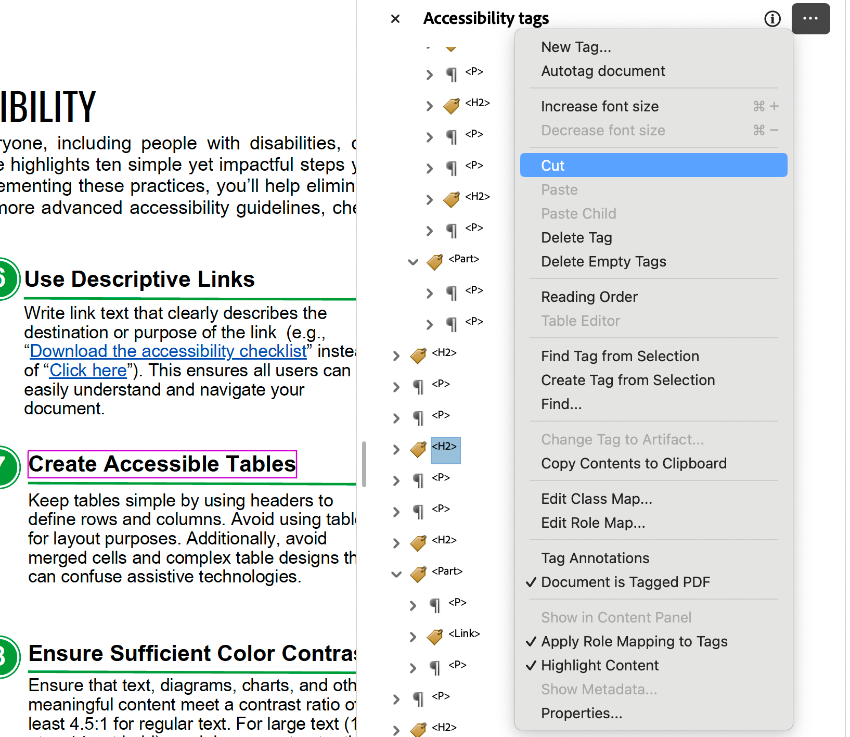
Cut and Paste
- Open the Tags window in the Side Panel menu.
- Select the tag you would like to move.
- Navigate to the three dots in the corner of your Tags window, indicating menu options.
- Select Cut.
- Right click on the tag that you want to move your cut tag above.
- Navigate to the three dots in the corner of your Tags window, indicating menu options.
- Select Paste.
The cut tag will now be pasted above the tag you selected.

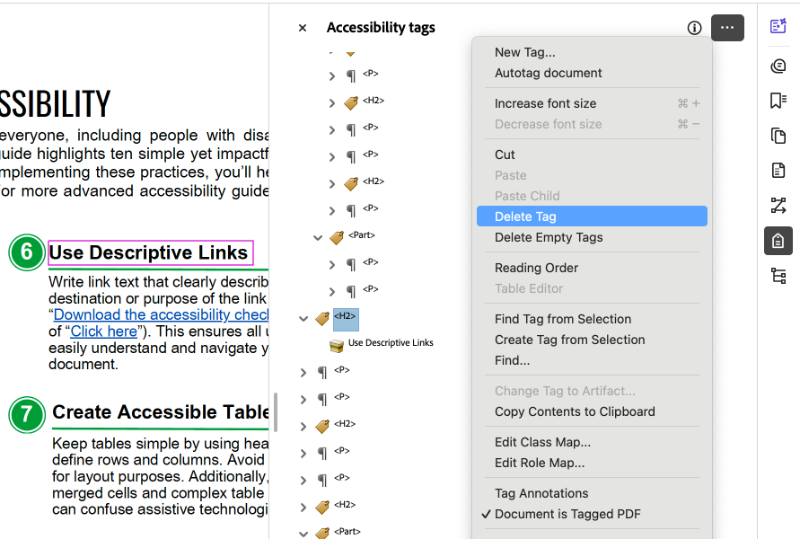
Delete Tags
- Open the Tags window in the Side Panel menu.
- Select the tag you would like to delete.
- Navigate to the three dots in the corner of your Tags window, indicating menu options.
- Select Delete Tag.
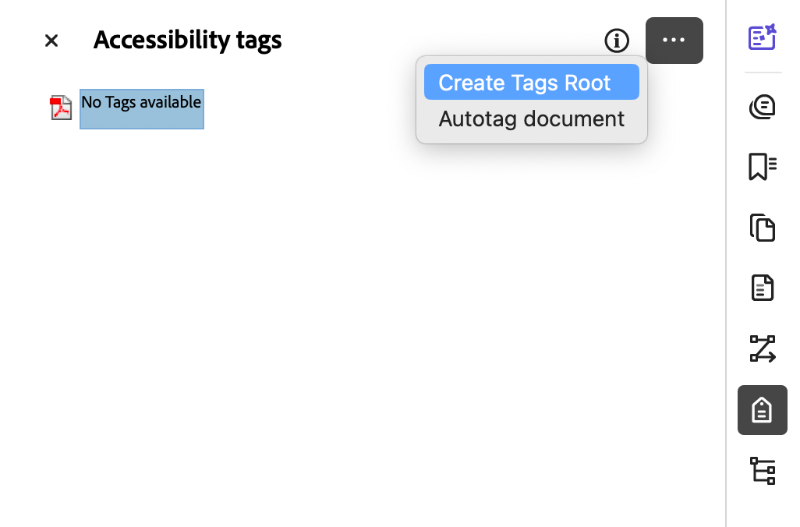
Manually Tag a Document
- Navigate to the Tags window in the Side Panel menu.
- Click on the three dots in the corner of your Tags window, indicating menu options.
- Select Create Tags Root.
- Navigate back to the three dots in the corner of your Tags window.
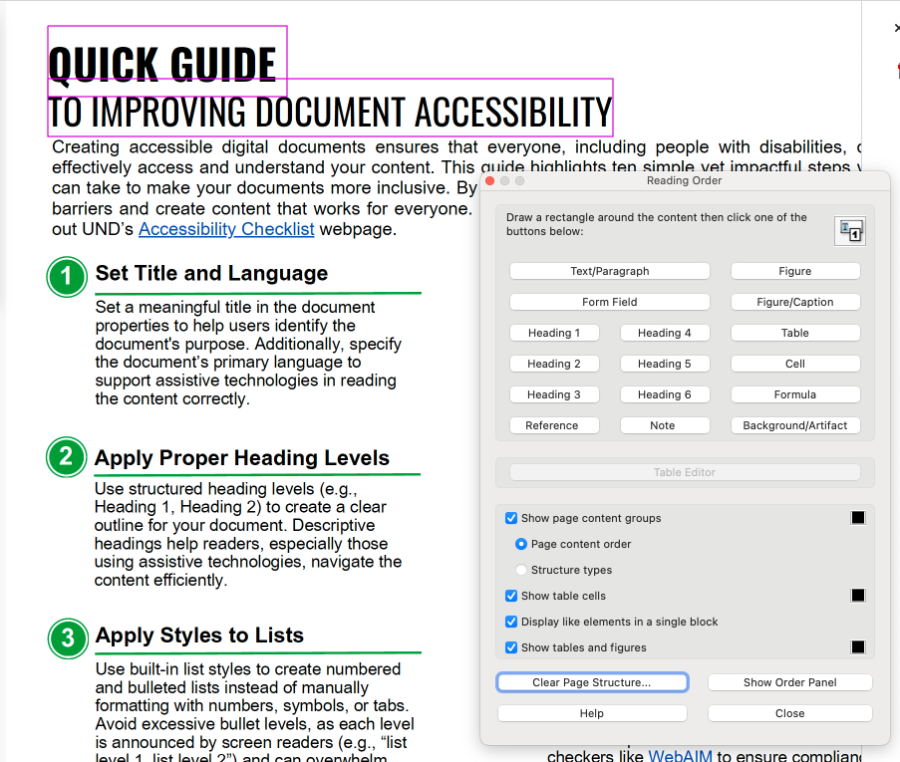
- Select Reading Order. The Reading Order tool dialogue box should open. In this box, you can designate content tags.
- Use your mouse to drag a box around the content you want to tag. Pink lines should demarcate which text has been selected.
- Once the text is selected, choose which tag you would like to apply.
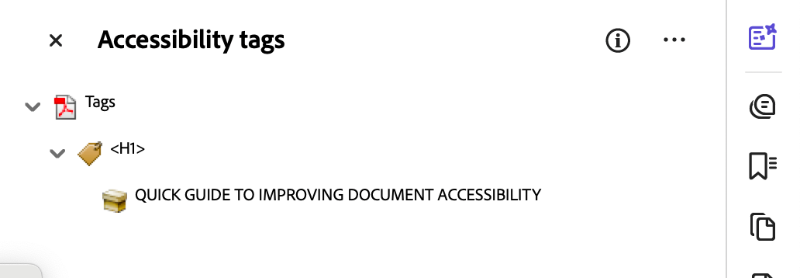
- Once a tag has been selected, the content will be numbered, and it will show up in the Tags Pane
- Open the Tags window in the Side Panel menu.
- Click on the three dots, indicating menu options.
- Select Autotag document. This option only appears if there are no document tags available.
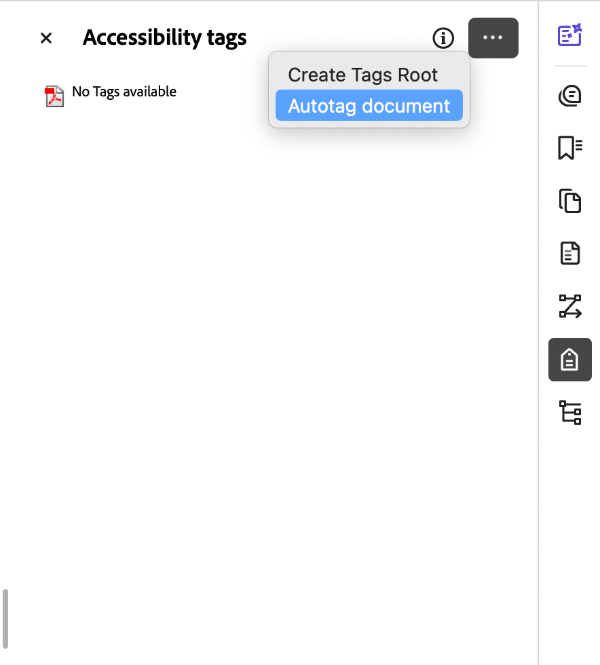
Important: While autotagging seems like the simple option, it can create trouble. Review all tags to ensure proper semantic structure and reading order.
Forms in Adobe Acrobat DC
Creating forms in Adobe Acrobat can be straightforward, but ensuring they are accessible requires additional steps. Beyond simply adding form fields, you must include descriptive titles, proper tags, and a logical reading order to make the form usable for all users, including those relying on screen readers.
To create a form in Adobe Acrobat, you must add form fields to your document. This can be done in two ways: automatically using Acrobat’s form field detection tool or manually by adding fields yourself. Adobe Acrobat's automatic detection tool is generally effective in identifying form fields. We recommend using this tool first. Once form fields have been identified, you can always go back in and manually add missing form fields or edit existing ones.
Automatic Form Field Detection
- Open the Prepare a Form tool.
- Enable form field detection. If a dialog box appears asking if the document is a fillable form, select Yes, Detect Form Fields.
- All detected form fields will be selectable and include placeholder text.


Manually Adding Form Components
When manually adding form fields, you have a variety of options to choose from. These include
- Checkboxes
- Radio button
- Drop down lists
- List boxes
- Buttons
- Field dates
- Digital signatures
All of these options can be accessed in the Prepare a Form window.

Automatically generated form fields will have generic placeholder text like Text Box 1, Text Box 2, etc. It is imperative that form creators replace this text with descriptive labels. This ensures that screen reader users can pair empty form fields with associated text. Without descriptive form fields, screen reader users may struggle to navigate and complete the form accurately. In addition to a descriptive title, best practices recommend that form creators add tooltips. Tooltips provide guidance on how to fill out a form field. For example, a form field labeled Date is informative, but it does not provide guidance on the specific format required. A good tooltip might be Type out your date in MM/DD/YYYY format.
Add Descriptive Titles and Tooltips
-
Right click on a form field box.
-
Select Properties from the menu.
-
Type in a descriptive title in the Name box.
-
Type in helpful instructions in the Tooltip box.


Once all form fields have been added, you will need to tag them appropriately. Form fields are labeled automatically as Unmarked Annotations, so they will not appear in the Content, Tags, or Reading Order menus.
Add Tags to Form Fields
-
Open the Tags display pane in the Side Panel menu.
-
Click on the three dots in the upper right-hand corner, indicating menu options.
-
Choose the option labeled Find.
-
Choose Find: Unmarked Annotations from the drop-down list.
-
Select Search Document.
-
Click on the Find button.
-
Found elements will be highlighted in pink. Tag Elements for all found elements.


After checking both your labels and tag structure, you will need to ensure the reading order of the form fields is correct. Begin by enabling the setting that displays the form field tab numbers; this will help evaluate their sequence. This will help you assess the correct reading order. If the form fields are out of order, you can re-order them by simply dragging and dropping them into the correct order.
Show Form Field Tab Numbers
-
Open the Fields display pane in the Side Panel menu.
-
Click on the three dots in the upper right-hand corner, indicating menu options.
-
Choose the option labeled Show Tab Numbers.
Use these numbers to help you re-order your form fields within the Fields display menu.


Resources
On-Demand Training
As part of its effort to meet the Title II ADA Digital Accessibility requirements, UND has partnered with Deque University to provide an expansive selection of on-demand digital accessibility training modules to all UND employees. Explore accessibility in Adobe Acrobat by taking the self-paced trainings, Basic PDF Accessibility and Advanced PDF Accessibility.