Remediate PDFs in Adobe Acrobat
Remediate to elevate access.
Accessible PDFs benefit all users from a Universal Design (UD) perspective. PDFs that have been made accessible are easier to navigate, are searchable, and can be accessed by text-to-speech (TTS) or screen reader software. Accessible PDFs can also reduce the need for student accommodation requests. Students who rely on assistive technologies like NVDA or JAWS to access course materials will be able to engage with their readings more easily. By proactively fixing your PDFs, students are less likely to request alternative format accommodations from Student Disability Resources.
Install Adobe Acrobat Pro
Prior to remediating a document, you will need to claim and install your Adobe Acrobat Pro account. All current UND faculty and staff members have access to Adobe Acrobat Pro as part of the university’s Adobe licensing agreement. Acrobat Pro allows users to view, create, edit, sign, manage, and remediate PDF documents.
For instructions on how to claim your account, visit UIT’s Knowledge Base article on Adobe Acrobat Pro.
Video Tutorial
Once you install Adobe Acrobat Pro, you will need to set up the user interface for accessibility.
PDF Remediation Steps
Run the Accessibility Checker to test for accessibility issues. This checker verifies if your document conforms to prevailing accessibility standards, such as PDF/UA and WCAG 2.1. It will prompt you to fix any issues it finds. Running the Accessibility Checker should be both one of the first and last things you do in a PDF. For more information, see Adobe Support's documentation on Verifying PDF Accessibility.
Video Tutorials
- Accessing and Understanding the Accessibility Checker (8:18)
- Common Errors:
Launch the Accessibility Checker
- Navigate to the All Tools option.
- Select Prepare for accessibility.
- Select Check for accessibility. The Accessibility Checker Option dialogue box will appear.
- Click Start Checking at the bottom of the Accessibility Checker Option dialogue box. The Accessibility Checker pane will open on the right-hand side of the screen.


A document's title and language is part of its metadata. Metadata is the descriptive information embedded within a file that helps identify and organize the document. This data is not visible to the eye; rather, it is contained within the code.
Additional metadata includes the author's name, a subject description, and keywords. This metadata helps users and systems quickly locate the document in a library, database, or search engine by matching the keywords to search queries. In Adobe Acrobat, this additional data can be entered in the same dialogue box as the document title.
Video Tutorial
Steps to Set the Document Title
In Windows
- Navigate to the Menu tab.
- Select Document properties.
- In the Document Properties box, select the Description tab.
- Enter the title in the Title field.


On Mac
- Navigate to the File tab.
- Select Document properties.
- In the Document Properties box, select the Description tab.
- Enter the title in the Title field.


Steps to Set the Document Language
In Windows
- Navigate to the Menu tab.
- Select Document properties.
- In the Document Properties box, select the Advanced tab.
- Enter the language in the Language field under Reading Options.

On Mac
- Navigate to the File tab.
- Select Document properties.
- In the Document Properties box, select the Advanced tab.
- Enter the language in the Language field under Reading Options.

Some PDF security settings may prevent screen reader users from accessing accessibility features. Check your security permissions in Document Properties to ensure that “Protected View” and “Enhanced Security” is disabled. For most documents, the "No Security" option is preferred.

Tagging PDFs is crucial for document accessibility. Document tags provide an underlying formatting structure that defines the document's layout and enables screen readers to navigate the content more effectively. These tags make it possible for screen readers to identify elements such as headings, lists, tables, etc.
For more information on how to tag your document, see the tutorials section on tagging PDFs in Adobe Acrobat Pro.
Video Tutorials
- Introduction to Tags (7:55)
- Autotagging in Adobe Acrobat (8:44)
- Change, Combine, Delete, and Reorder Tags in Adobe Acrobat (11:13)
- Manually Tag PDFs using the Reading Order Panel (7:55)
- Tag a List (11:39)
- Tag a Nested List (6:56)
- Tag a Table (12:29)
- Tag an Image (6:44)
Reading order and tag structure are closely related. A document's reading order is the sequence in which content tags are read. A correct tag tree ensures a logical reading order, which is crucial for screen readers and assistive technology. Ensuring the correct reading order prevents potential confusion, as the visual layout may not always match the intended reading order. Complex layouts, particularly those with tables or multi-column designs, can disrupt the intended reading order.
For more information on how to tag your document, see the tutorials section on Reading Order in Adobe Acrobat Pro.
Video Tutorials
- Introduction to Reading Order (4:57)
- Set and Edit Reading Order (6:29)
If your document contains images, they must first be tagged as figures.
Video Tutorial
- Tag an Image (6:44)
Add Alternative Text from the All Tools Menu
- Select Prepare for Accessibility from the Tools menu.
- Select Add Alternate Text from the Accessibility toolbar.
- Add a clear description in the Text field box.


Tagging in Adobe Acrobat
Container / Group Tags
Container tags help group other tags. These tags are not required, but they can be
useful in organizing page structure and improving document navigation. All container
and group tags exist under the <Document> tag.
| Tag | Name | Purpose | Image |
|---|---|---|---|
| <Document> | Document | Main document tag under which all tags are nested |  |
| <Part> | Part | Divides the document into major sections (e.g., chapter or report) |  |
| <Sect> | Section | Divides parts of a document into groups |
|

Text Tags
Text tags designate text elements utilized in the body of the document. They define and structure document elements, creating hierarchy and improving content readability and navigation.
| Tag | Name | Purpose | Image |
|---|---|---|---|
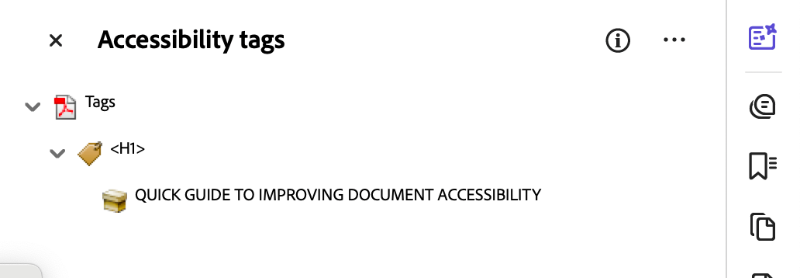
| <H1> | Heading 1 | A document's title |  |
| <H2> | Heading 2 | Main level heading |  |
| <H3> - <H6> | Heading 3 - Heading 6 | Subheadings |  |
| <P> | Paragraph | Body text |  |
| <BlockQuote> | Quote | Quote contained in its own paragraph |  |
| <L> | List | Tag under which all list items are nested |  |
| <LI> | List Item | Contains list item elements <Lbl> and <LBody> |  |
| <Lbl> | Label | The number or bullet character associated with a list item |  |
| <LBody> | Label Body | Text associated with a list item |  |
| <Link> | Hyperlink | Link to a webpage or document |  |
| <OBJR> | Object Reference | Nested under a <Link> tag; it is the active URL link |  |
| <TOC> | Table of Contents | Tag under which all Table of Contents entries are nested |  |
| <TOCI> | TOC Item | Entry within a table of contents; it houses the <Reference> and <Link> tags. |  |
| <Reference> | Reference | Internal link (e.g., footnote or TOC) |  |
Table Tags
Table tags are structural elements specific to creating tables. While tables exist in the body of a document and contain text elements, they are distinct from the body text. Table tags are used to define table structure, creating the grid-like layout we see here.
| Tag | Name | Purpose | Image |
|---|---|---|---|
| <Table> | Table | Tag under which all table tags are nested |  |
| <TR> | Table Row | Groups items in a table row |  |
| <TH> | Table Header | Heading cells within a row |  |
| <TD> | Table Data | Data cells with a row |  |
Figure Tags
Figure tags contain all image-related content. Therefore, all figure tags should have descriptive alternative text embedded into the tag. Images tagged as <Artifact> will have no place to input alternative text.
| Tag | Name | Purpose | Image |
|---|---|---|---|
| <Figure> | Figure | Photo or graphic (e.g., logo, illustration, photo, map, chart, etc.) |  |
| <Formula> | Formula | Mathematical formula |  |
Adobe Acrobat allows you to customize the side panel menu to view your frequently used tools.
Video Tutorial
Add Tags Window to Side Menu
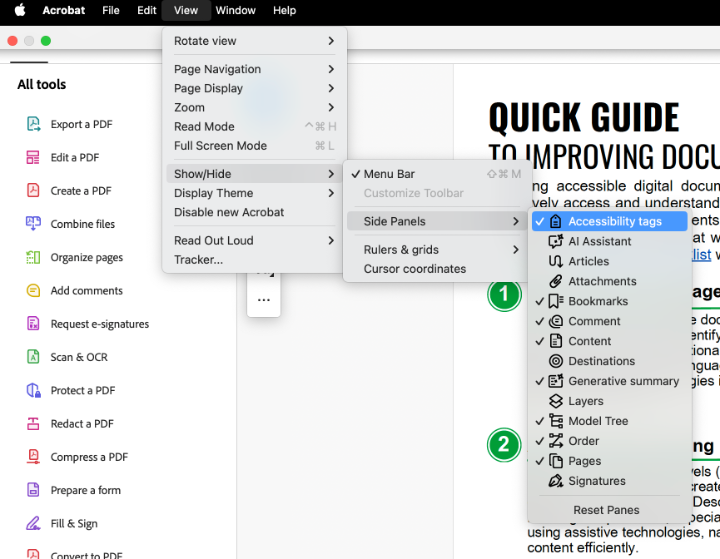
- Navigate to the View menu.
- Select (Windows) or hover over (mac) the Show/Hide option; A sub-menu should appear.
- Select or hover over Side Panels. A second sub-menu should appear.
- Select Accessibility Tags.
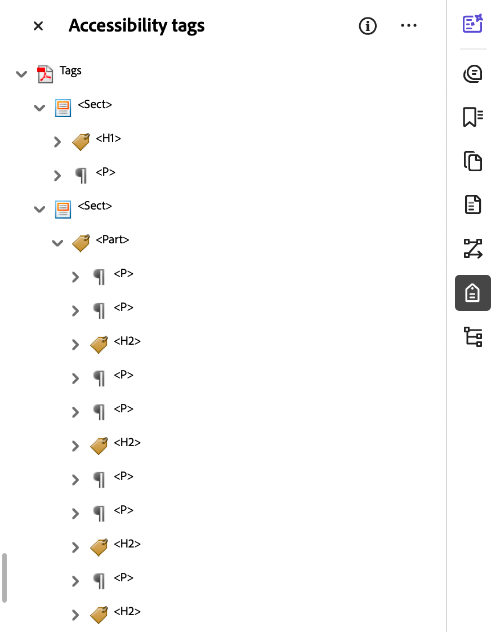
The Tags window should now show in your side panel menu on the right side of the screen. Tags will be displayed in order from top to bottom. Review all tags to ensure proper semantic structure and reading order.
Video Tutorial
Change an Existing Tag
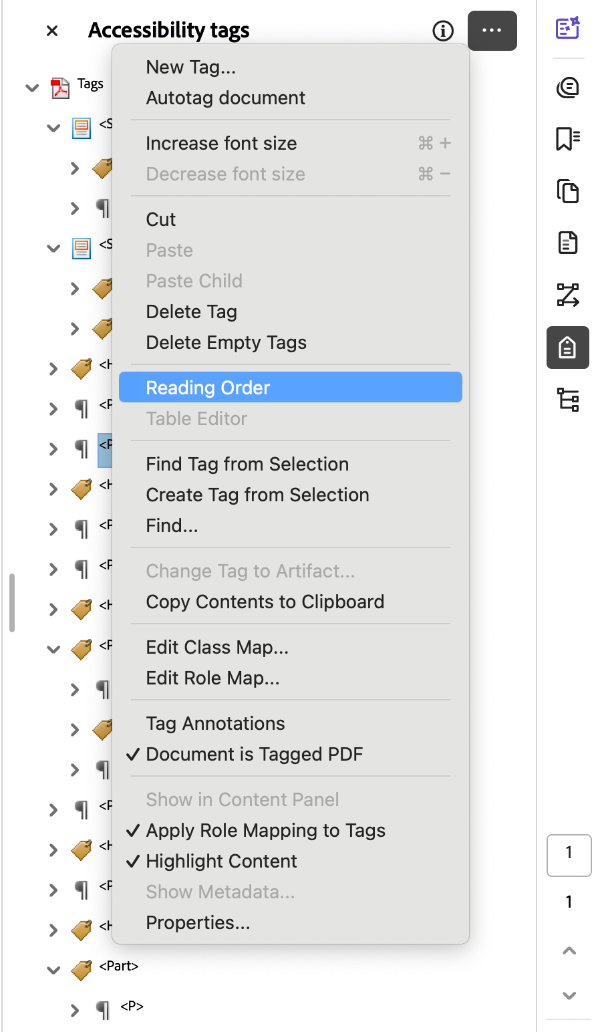
- Open the Tags window in the Side Panel menu.
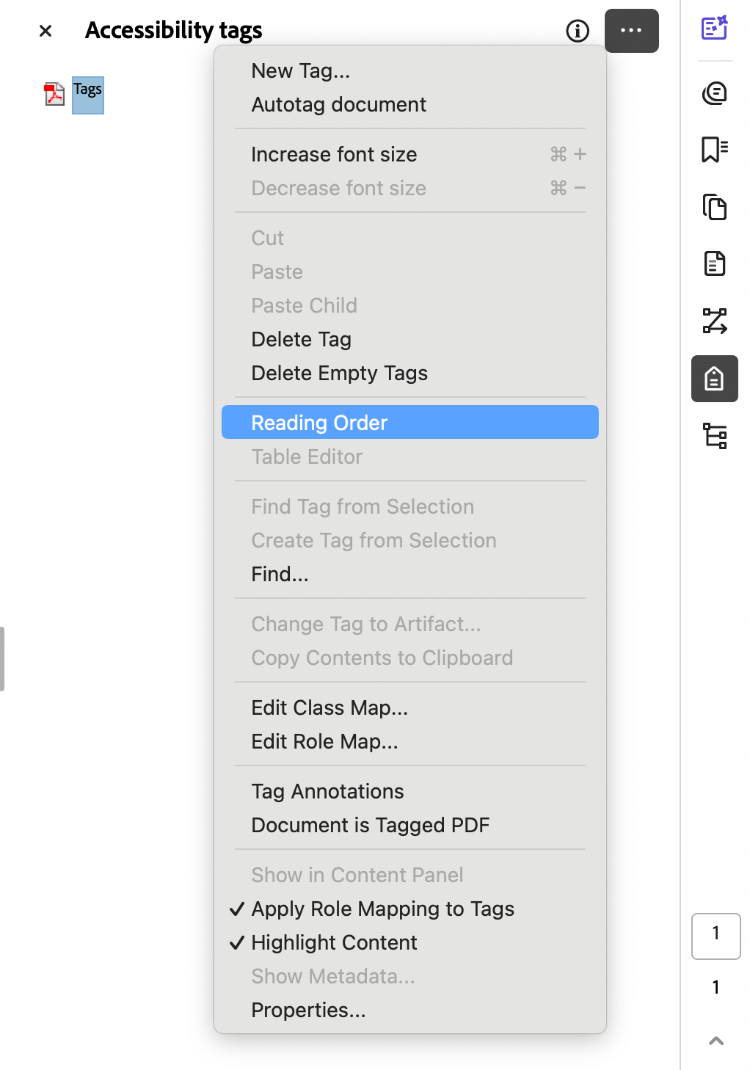
- Navigate to the three dots in the corner of your Tags window, indicating menu options.
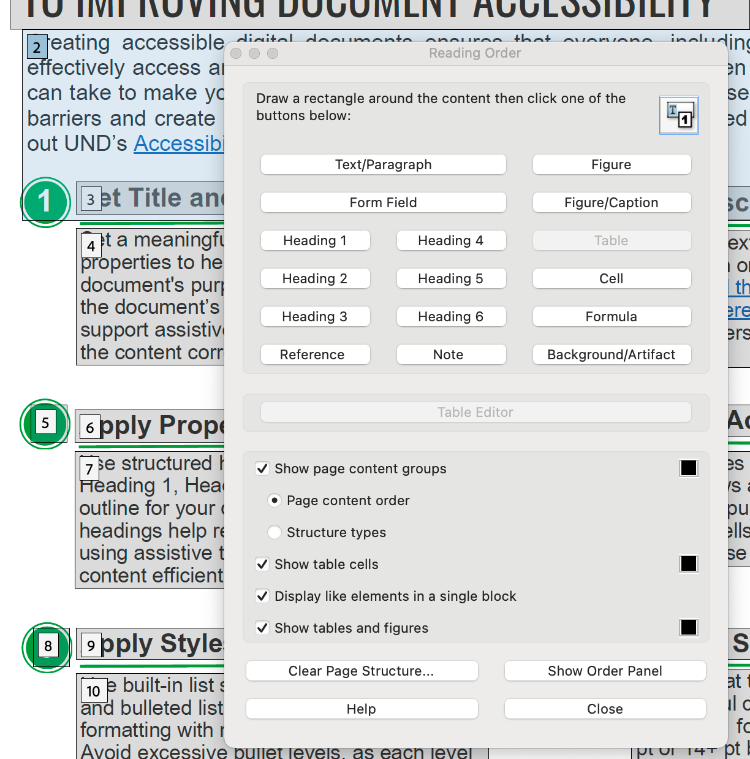
- Select Reading Order. The Reading Order tool dialogue box should open. In this box, you can designate content tags. Correctly designating tags creates a logical reading order.
- Click on the content box you would like to change.
- Select a new tag.
Video Tutorial
Drag and Drop
- Open the Tags window in the Side Panel menu.
- Select the tag you would like to move.
- Drag and drop the tag. As you drag the tag, a black line will appear. This line indicates places you may drop the tag.
Cut and Paste
- Open the Tags window in the Side Panel menu.
- Select the tag you would like to move.
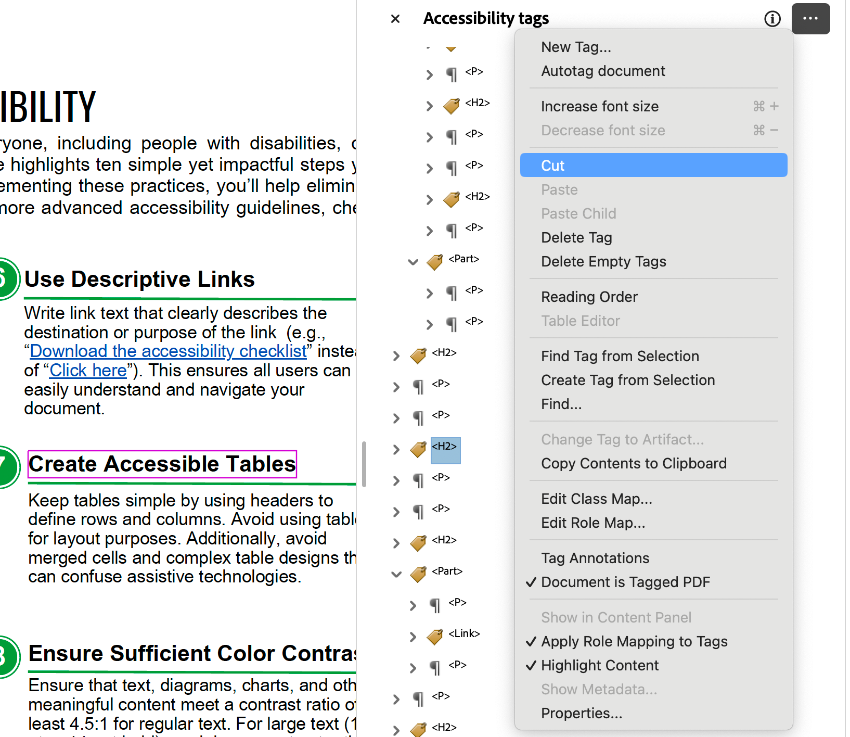
- Navigate to the three dots in the corner of your Tags window, indicating menu options.
- Select Cut.
- Right click on the tag that you want to move your cut tag above.
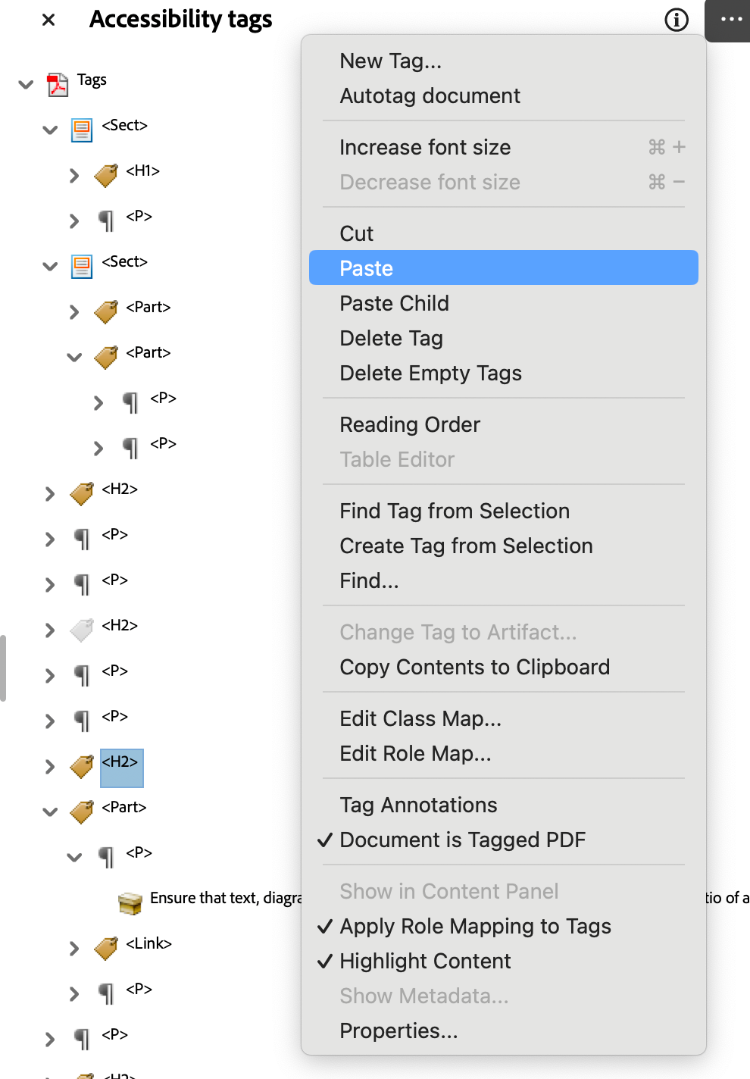
- Navigate to the three dots in the corner of your Tags window, indicating menu options.
- Select Paste.
The cut tag will now be pasted above the tag you selected.
Video Tutorial
Delete Tags
- Open the Tags window in the Side Panel menu.
- Select the tag you would like to delete.
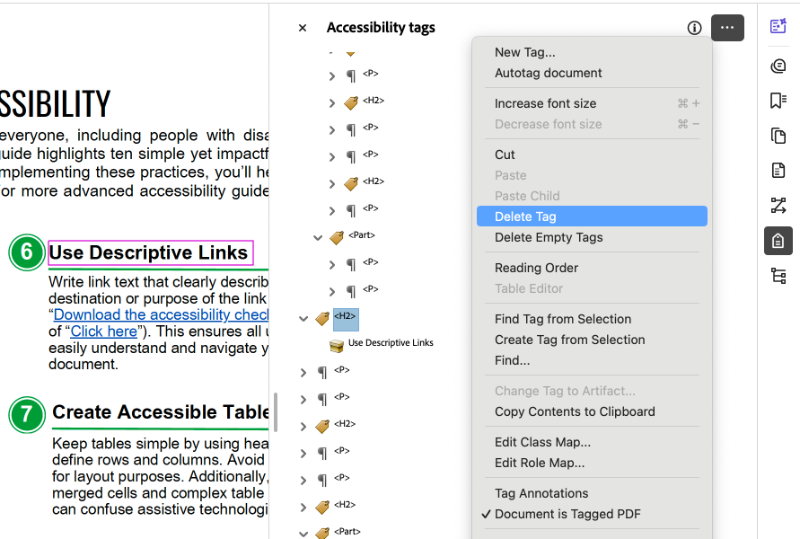
- Navigate to the three dots in the corner of your Tags window, indicating menu options.
- Select Delete Tag.
Video Tutorial
- Manually Tag PDFs using the Reading Order Panel (7:55)
- Tag a List (11:39)
- Tag a Nested List (6:56)
- Tag a Table (12:29)
- Tag an Image (6:44)
Manually Tag a Document
- Navigate to the Tags window in the Side Panel menu.
- Click on the three dots in the corner of your Tags window, indicating menu options.
- Select Create Tags Root.
- Navigate back to the three dots in the corner of your Tags window.
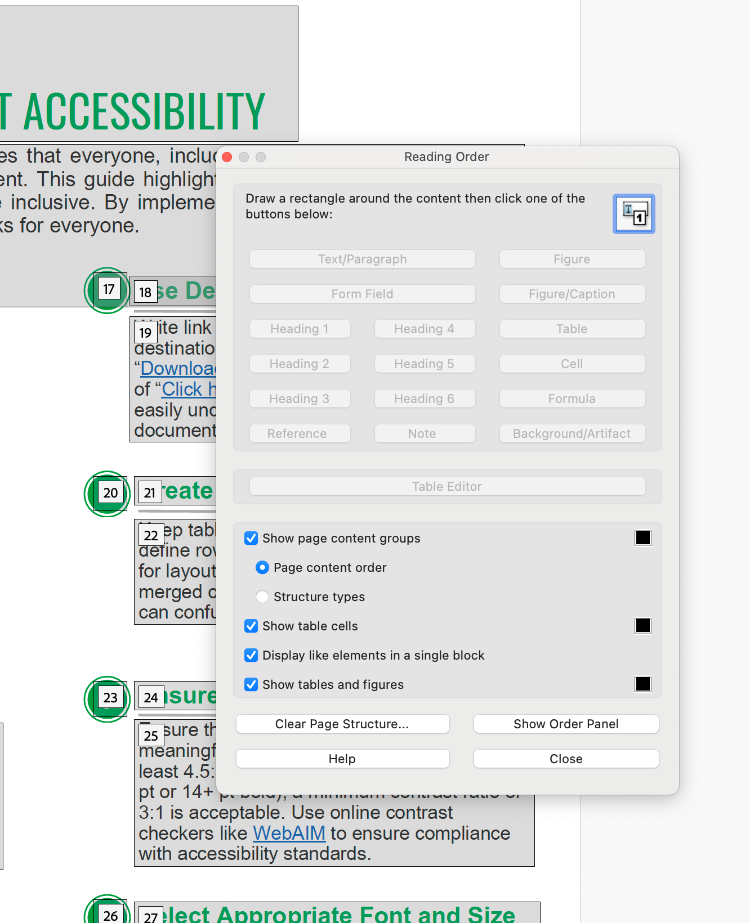
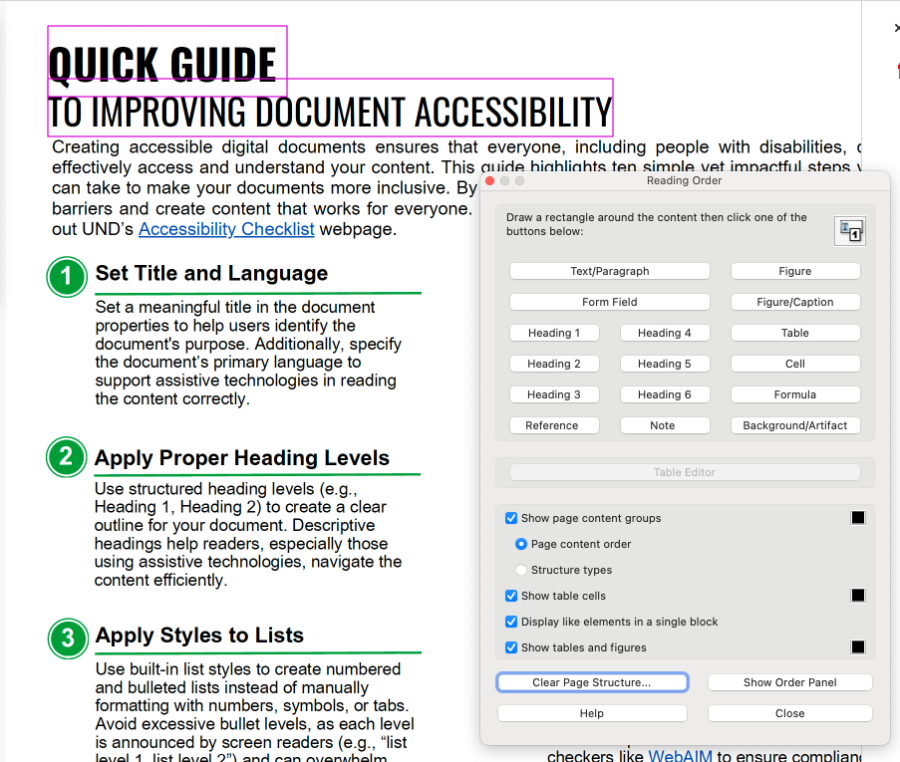
- Select Reading Order. The Reading Order tool dialogue box should open. In this box, you can designate content tags.
- Use your mouse to drag a box around the content you want to tag. Pink lines should demarcate which text has been selected.
- Once the text is selected, choose which tag you would like to apply.
- Once a tag has been selected, the content will be numbered, and it will show up in the Tags Pane

Video Tutorial
-
Autotagging in Adobe Acrobat (8:44)
Autotag a Document
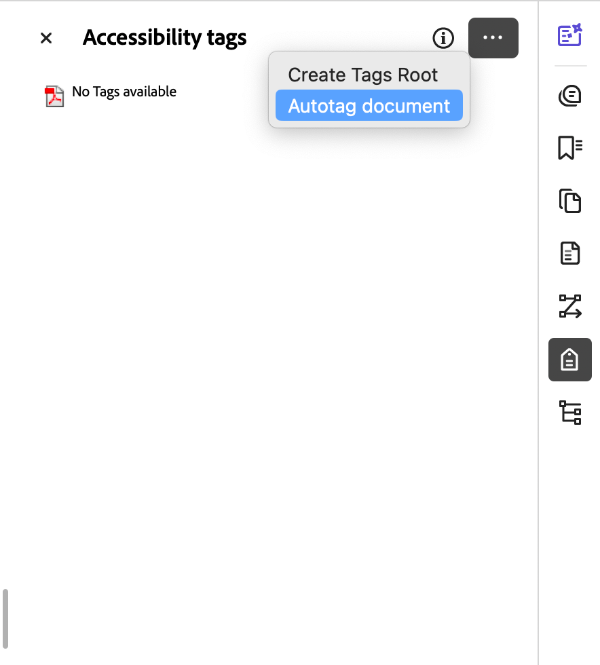
- Open the Tags window in the Side Panel menu.
- Click on the three dots, indicating menu options.
- Select Autotag document. This option only appears if there are no document tags available.
Important: While autotagging seems like the simple option, it can create trouble. Review all tags to ensure proper semantic structure and reading order.
Reading Order in Adobe Acrobat
Adobe Acrobat allows you to customize the side panel menu to view your frequently used tools.
Video Tutorial
Add Reading Order Window to Side Panel
- Navigate to the View menu.
- Select (Windows) or hover over (mac) the Show/Hide option. A sub-menu should appear.
- Select or hover over Side Panels. A second sub-menu should appear.
- Select Order. Here, you can also select the three most frequently used tools: Tags, Order, and Bookmarks.


There are two ways to access the Reading Order tool.
Video Tutorials
Option 1
- Navigate to the All Tools menu.
- Click View more at the bottom.
- Scroll down the menu and select Prepare for Accessibility.
- Select Fix Reading Order.
- The Reading Order tool dialog box should open. In this box, you can designate content tags. Correctly designating tags creates a logical reading order.


Option 2
- Navigate to the Order option in the side panel. This is the side panel we set up in the beginning.
- Click on the three dots, indicating menu options.
- Select the Show reading order panel option.


For documents that have no document structure set (Reading order and/or Tags), use the Reading Order tool dialog box to tag and order content.
Video Tutorials
- Set and Edit Reading Order (6:29)
Set the Reading Order
- Position the Reading Order tool dialog box to the side of the document.
- Use your cursor to drag a box around the content you want to tag. Pink lines should demarcate which text has been selected.
- Choose which tag you would like to apply.
-
Once a tag has been selected, the content will be numbered, and it will show up in the Reading Order Pane.
-
The tag pane will also indicate how the content has been tagged.


Video Tutorials
- Set and Edit Reading Order (6:29)
Edit the Tag Associated with Content
- Select the pre-tagged /ordered content (numbered content highlighted in gray).
- Select a new tag from the Reading Order tool dialog box.

Edit the Order Content is Read In
- Navigate to the Order Panel in the side bar.
- Click on the numbered content block.
- Drag and drop the content into the order you desire.

Go Deeper!
Deque University
As part of its effort to meet the Title II ADA Digital Accessibility requirements, UND has partnered with Deque University to provide an expansive selection of on-demand digital accessibility training modules to all UND employees. Explore accessibility in Adobe Acrobat by taking the self-paced trainings, Basic PDF Accessibility and Advanced PDF Accessibility.
External Resources
- The Accessibility Guy — How Do I Know If My PDF is Accessible? (3:16)
- The Accessibility Guy —How to set Title, keywords, subject, author, and language in Adobe Acrobat PRO DC (2:54)
- The Accessibility Guy — How to tag a PDF | Adobe Acrobat Pro DC (6: 27)
- The Accessibility Guy — How to tag a table in Adobe Acrobat Pro | Full Walkthrough WCAG Section 508 (12:56)
- The Accessibility Guy — Ultimate Guide: Manually Tagging Nested PDF Lists in Adobe Acrobat Pro for Enhanced Accessibility (6:55)
- The Accessibility Guy — How to set the reading order of a PDF | Adobe Acrobat PRO DC (5:08)
- WCAG 2.1 Techniques — PDFs