Microsoft Word
Clear. Inclusive. Accessible—One Word document at a time.
Ensuring accessibility in Word is essential for creating inclusive and usable documents. Refer to the Accessibility Checklist for Microsoft Word to verify that your file meets the needs of all readers. In addition, Word users must complete the following action items to fully achieve accessibility standards.
A document's title and language is part of its metadata. Metadata is the descriptive information embedded within a file that helps identify and organize the document.
Video Tutorial
Steps to Set the Document Title
In Windows
- Navigate to the File tab.
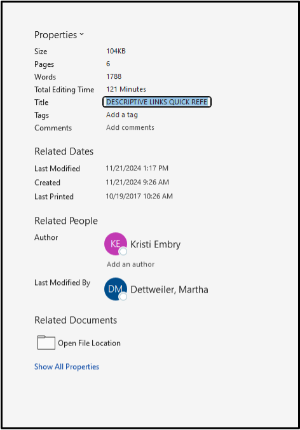
- Select the Info tab.
- On the right-hand side of the screen, select the Title field. Double click to edit the text in this field.
On Mac
- Navigate to the File tab.
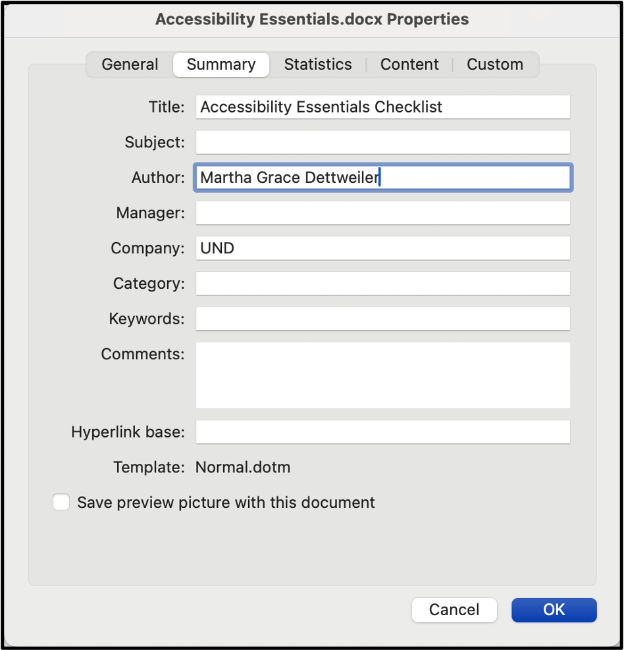
- Select Properties at the bottom of the context menu.
-
In the Properties dialogue box, select Summary and enter the document title in the Title field.
Steps to Set the Document Language
In Windows
- Navigate to the File tab.
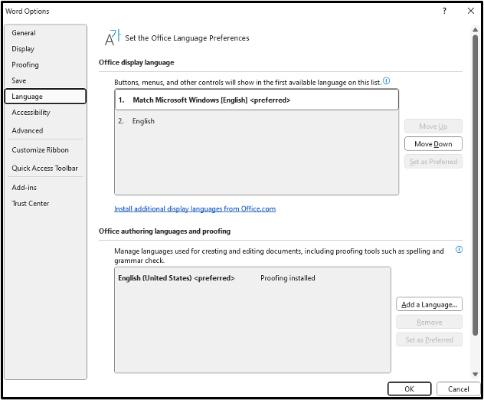
- Select the Options tab at the bottom.
- In the Options pane, select the Language tab. Choose which language you prefer for both display purposes and reading and proofing purposes. You may have to download a language extension for less common languages.
On Mac
- Navigate to the File tab.
- Select Properties at the bottom of the context menu.
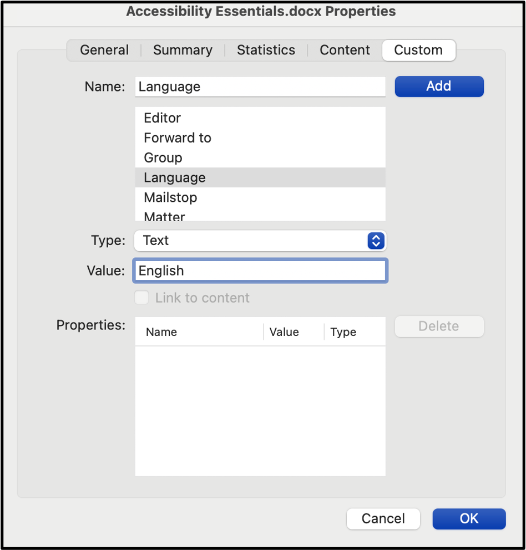
- In the Properties Dialogue box, select Custom.
- In the Name field, scroll down to select language. Once language is selected, type the preferred language in the Value field. Then, click add.
- The language property should populate in the Properties field box. Click OK to apply the changes.
Headings are signposts that structure text documents and allow readers to more easily navigate their way around a document.
Video Tutorials
- Creating Accessible Headings in Microsoft Word (18:57)
- Microsoft Support: Customize or Create New Styles (0:46)
Using Styles to Apply Headings
Creating headings in Word involves more than simply bolding or emphasizing text. Instead, headings are managed by what word calls styles, built-in formatting characteristics that can easily be applied to text. Styles can be applied one of two ways in Word.
Using the Styles Ribbon
Select the appropriate heading level using the Styles toolbar on the Home Ribbon.
Using the Styles Pane
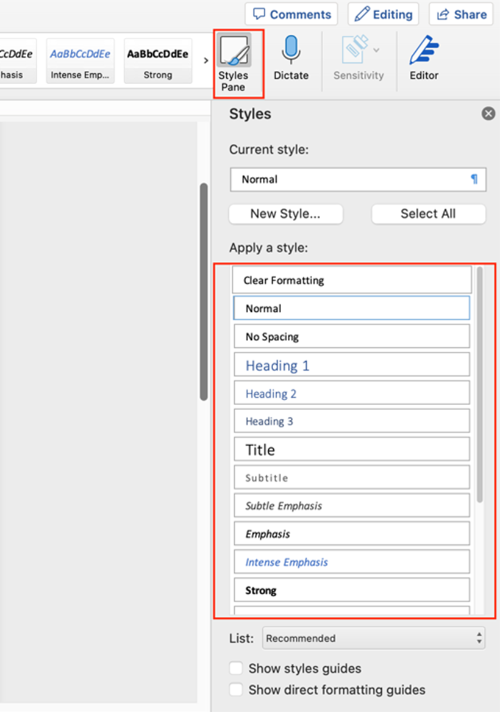
If you prefer, you can also open the Styles options in a pane at the side of your screen. Select the Styles Pane at the right-hand side of the Styles Ribbon. The pane will open on the right-hand side of your document.
Modifying Styles
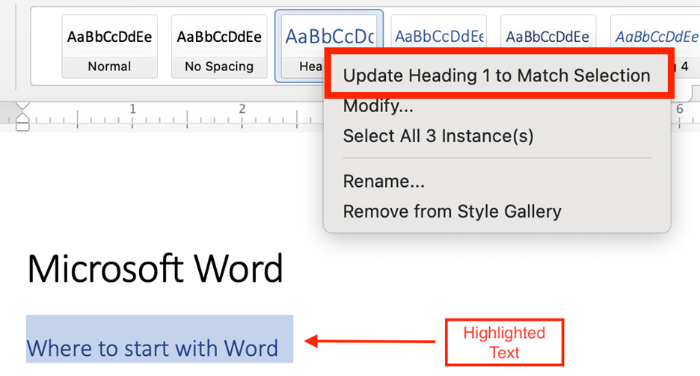
Word Headings are preformatted, but you can easily customize the visual appearance of your headings across an entire document. Take Heading 1 as an example:
- Set the font, color, spacing, etc., to what you would like Heading 1 to be.
- Highlight the correctly formatted text.
- Right-click on Heading 1 in the Ribbon (or the Styles Pane), and click Update Heading 1 to Match Selection.
- Now each Heading 1 will use your preferred formatting. You should see that all Heading 1 text has changed throughout your document. (You can also click Modify for more formatting options.)
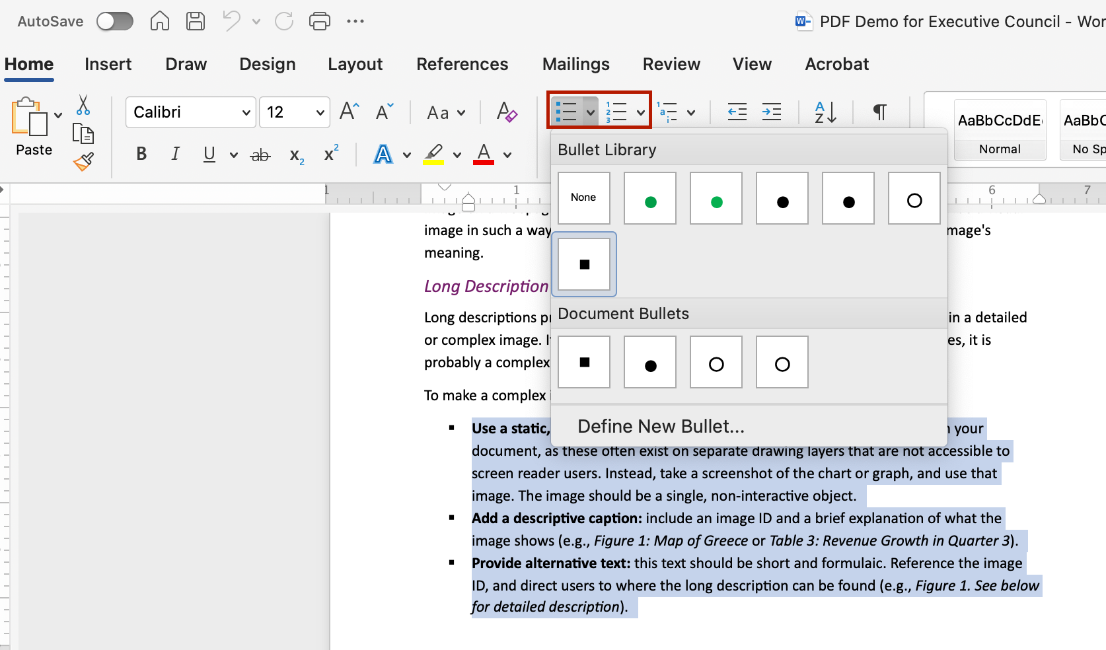
Utilize built-in list styles to create numbered and bulleted lists instead of manually formatting lists with numbers, symbols, or tabs.
Video Tutorial
Steps for Applying Pre-Set List Styles
- Highlight the desired list text.
- Choose the Numbered List or Bulleted List option.
- Select your preferred list style from the drop-down menu.
When adding Images, always include alt-text. This ensures that users relying on screen readers can understand the content of visual elements, even if they can't see them
Video Tutorials
- Creating Accessible Simple Images in Microsoft Office (6:23)
- Microsoft Support: Improve accessibility with alt text (2:07)
Add Alternative Text to Images
- Navigate to the Insert tab.
- Select Pictures.
- Choose how you would like to import the image.
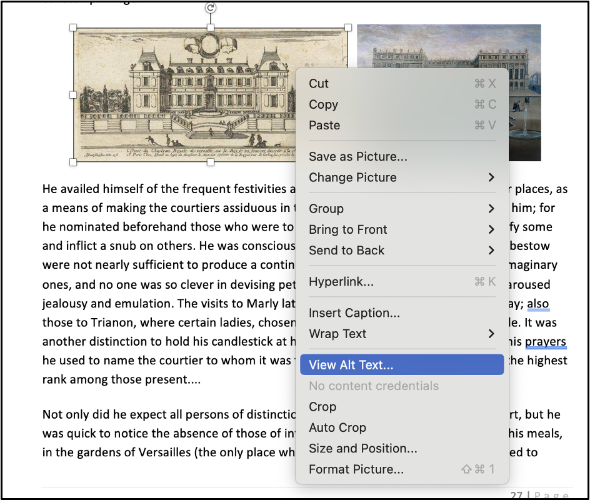
- Right-click on the image.
- Then, select Edit Alt Text (Windows) / View Alt Text (Mac) from the menu. An Alt Text Pane will open on the right-hand side of the screen.
- Type your alt-text into the text box. This text will auto save.
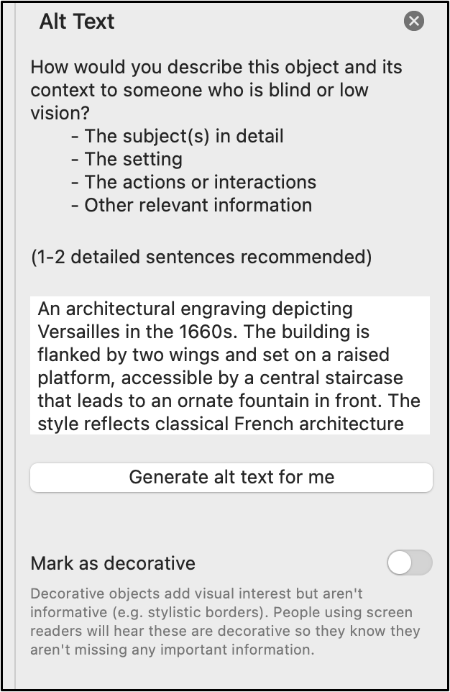
Long descriptions provide a textual version of the essential information conveyed in a detailed or complex image.
Video Tutorials
Where to Place Long Descriptions in Microsoft Word
Because long descriptions are rather lengthy and detailed, they can’t be put into alt-text fields. Instead, you’ll need to decide where to put them. You have two options:
- Describe the image in the surrounding text. Screen readers will benefit from this placement, as will other readers.
- If your space is limited, you can create an appendix that contains the long description. If you go with this option, make sure you link from the original location to the appendix AND link from the appendix to the original text. That way, users can easily navigate back and forth between the original text, image, and description.
Long Description Example
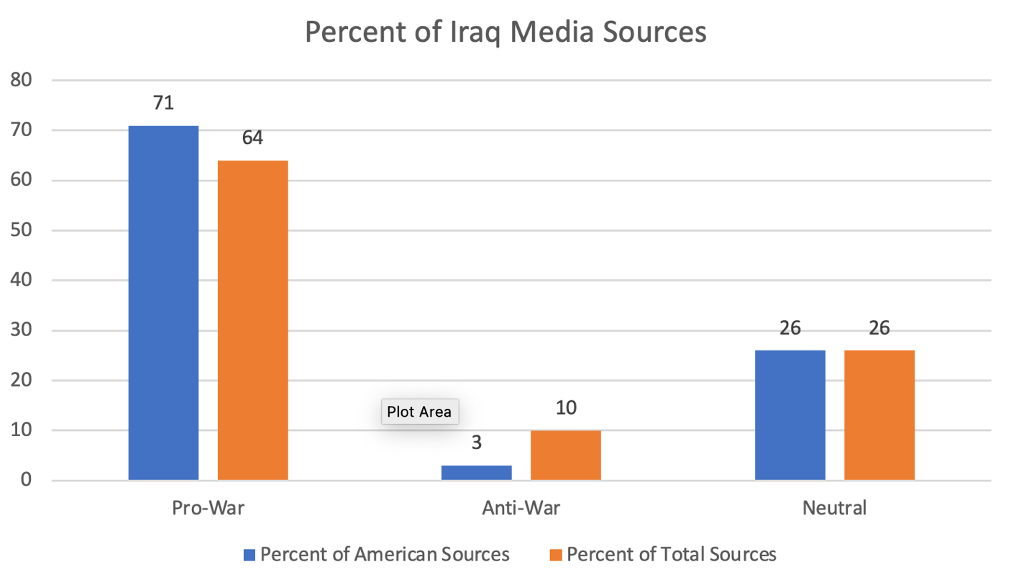
Consider this chart. There are three ways to provide long description.
When creating tables in Word, simplicity is key. Complex table designs can confuse users of assistive technologies. To ensure table accessibility, follow these best practices:
- Build all tables in the original document. Avoid drawing, importing, or inserting tables as an image file.
- Use tables for data only, not for layout purposes.
- Use a simple table structure with a clearly marked header row and first column.
- Ensure that table header rows repeat across pages.
- Avoid using blank, merged, and split cells. These can create issues for screen reader users, who may not be able to navigate the table in a logical reading order.
Video Tutorials
- Creating Accessible Tables in Microsoft Word (5:22)
- Microsoft Support: Create Accessible Tables in Word (2:18)
Steps for Creating a Table
There are two ways to create a table in Microsoft Word. Both ways involve navigating to the Insert tab, where you will select the Table option.
Visually Set Columns and Rows
In the first way, you will hover over squares to specify the table dimensions. In this example, I have hovered over squares indicating a 3x5 table (3 columns x 5 rows).
- Navigate to the Insert Tab.
- Select the drop-down arrow next to Table.
- Specify the dimensions of the table.
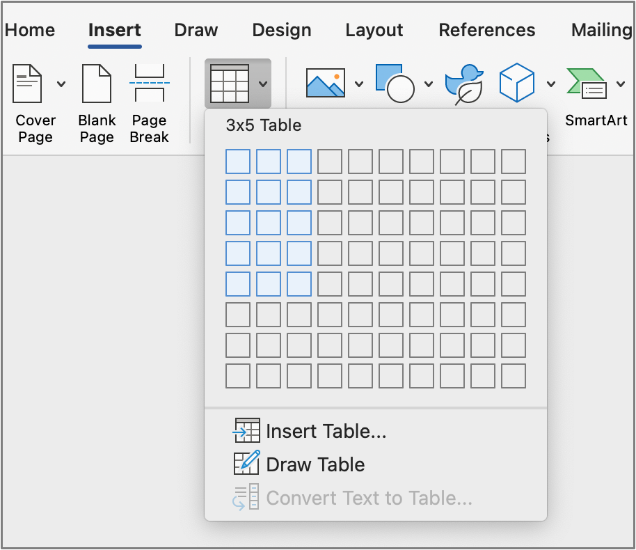
Insert a Table
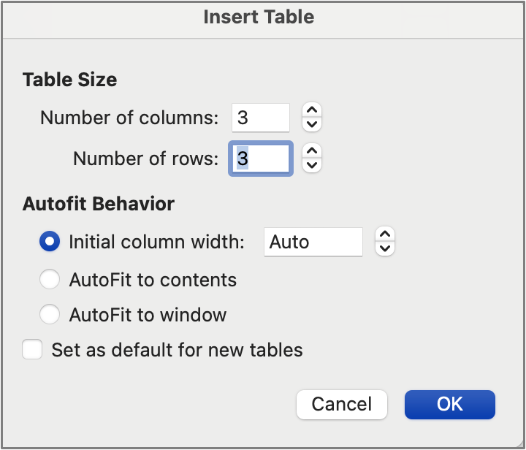
You may also choose to select the Insert Table option.
- Navigate to the Insert Tab.
- Select the drop-down arrow next to Table.
- Choose Insert Table. This will open the Table Editing pane.
- Input the number of columns and rows. You may also choose to manually specify column widths and how to treat cell data.
- Save changes by clicking Ok.
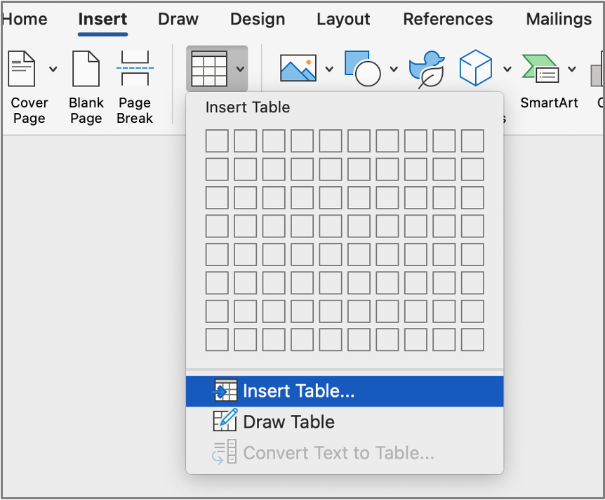
Set Table Header Row
A table header row is the top row of a table that serves as a title for the categories of information in each column. Designers often manually bold this row to create emphasis, but it's important to mark headers properly in the code to ensure they are structurally identified. Screen readers depend on these structural headers to help users understand the table's organization and navigate its content accurately.
In Word, Instructors can set the header row by:
- Select the Table in question.
- Highlight the row that you would like to make the Header Row.
- Navigate to the Table Design tab.
- Find the check-box labeled Header Row. Ensure that it is checked.

Repeat Table Header Rows Across Pages
When working with a long table that spans multiple pages, screen reader users may struggle to remember how data is organized across pages. To simplify navigation and improve accessibility, set the table to automatically repeat header rows on each page.
- Select the table by clicking on the selection icon at the top left corner of your table.
- Right-click on the top row of the table.
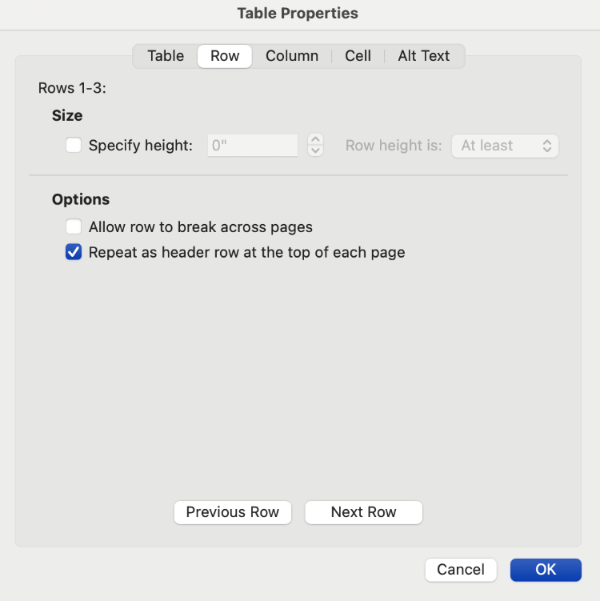
- Select Table Properties. A Table Properties Dialogue box will populate.
- Select the Row tab.
- Check the box beside Repeat as header row at the top of each page.
- Press OK to save your table preferences.
Write link text that clearly describes the link's purpose (e.g., "Download the accessibility checklist" rather than "Click here"). This ensures all users can easily understand the destination of the link.
Video Tutorials
- Creating Accessible Links in Microsoft Office (7:12)
- Microsoft Support: Create Accessible Links in Word (2:09)
Add Hyperlinks to Descriptive Text.
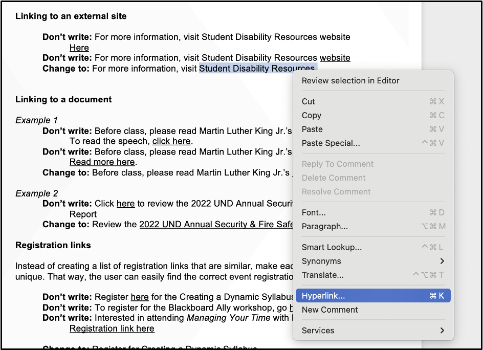
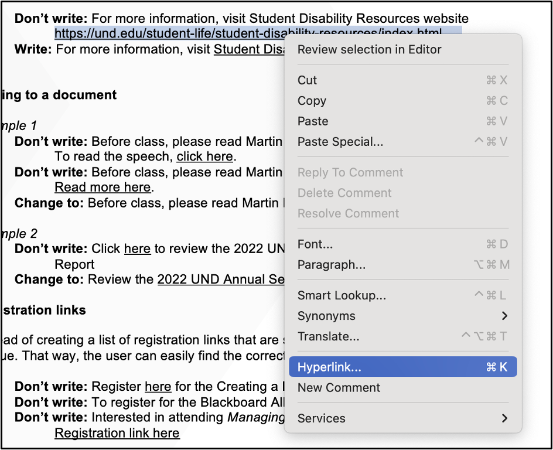
- Select the descriptive text you wish to link.
- Right-click on the text and select Edit Hyperlink (Windows) / Hyperlink (Mac).
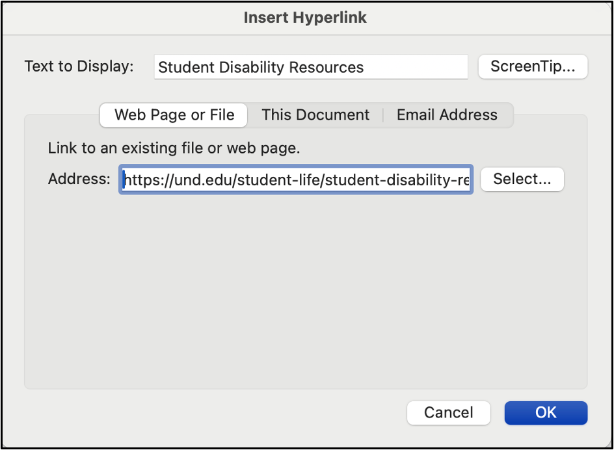
- In the Address field, enter your URL.
Add Descriptive Text to Hyperlinks
- Select the link.
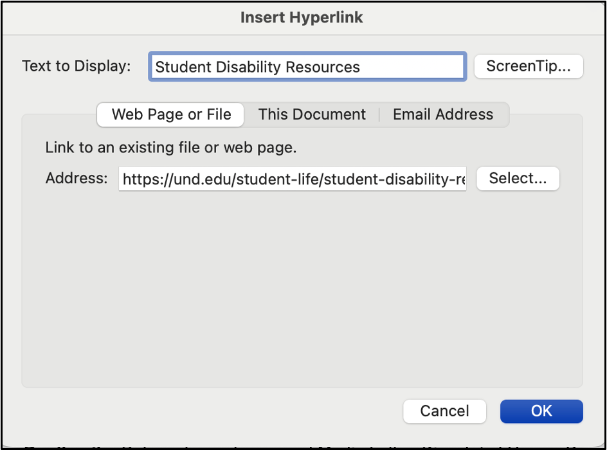
- Right-click on the link and select Edit Hyperlink (Windows) / Hyperlink (Mac).
- Insert the Descriptive Text you want to display in place of the URL in the Text to Display field at the top of the dialog box.
To ensure accessibility, all meaningful content should meet a contrast ratio of at least 4.5:1 for regular text. For large text (18+ pt. or 14+ pt. bold), a minimum contrast ratio of 3:1 is acceptable. Use online contrast checkers like WebAIM to ensure compliance with accessibility standards.
Microsoft Word has set black text on a white background as the default for all text options. While instructors can customize text color and background using the Font Color, Text Highlighter, and Shading options, they still must follow WCAG 2.1 AA color contrast guidelines. The Accessibility Checker in Microsoft Word will flag color contrast issues, but instructors are responsible for manually implementing these changes.
Video Tutorials
- Introduction to Accessible Color (15:55)
- Fixing Color Contrast (13:30)
- Fixing Color as the Sole Means of Information (11:08)
Steps for Editing Text and Background Color
- Highlight the desired text.
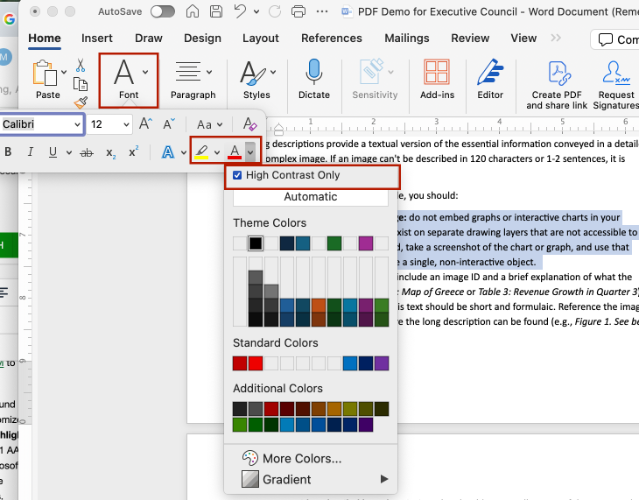
- Select the Font Color tool and/or the Text Highlighter tool.
- Choose from the pre-set colors OR input a 6-digit HEX color code.
- For greater accessibility, choose from colors displayed under the High Contrast Only colors.
Accessibility Tip: Avoid using color alone to convey emphasis. Screen reader users may not be aware when text is colored, and color-blind users might struggle to differentiate between colors. Use other methods of emphasis, such as bold or italics, in addition to color.
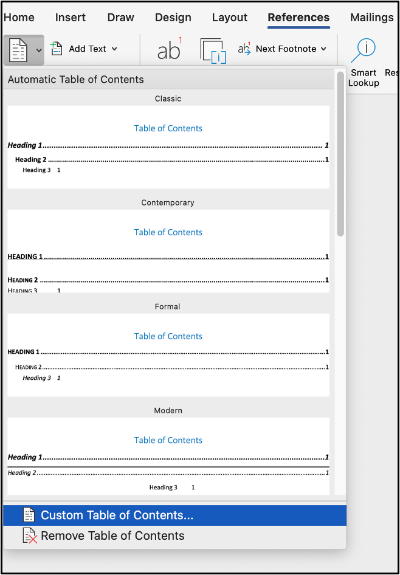
For documents spanning multiple pages, include a Table of Contents via the References tab. Microsoft Word's Table of Contents serves as a navigational guide by using heading structure to create internal links that allow readers to quickly jump to relevant parts of a document. Benefits of Microsoft Word's Table of Contents include automatic updates to format and style when heading text, sequence, or level change.
Video Tutorials
- Create a Table of Contents in Microsoft Word (7:06)
- Microsoft Support: Insert a Table of Contents (0:37)
Add a Table of Contents
To add a Table of Contents to your Microsoft Word document, finalize your heading structure. Ensure that all headers have the right text, order, and level.
- Navigate to the References tab.
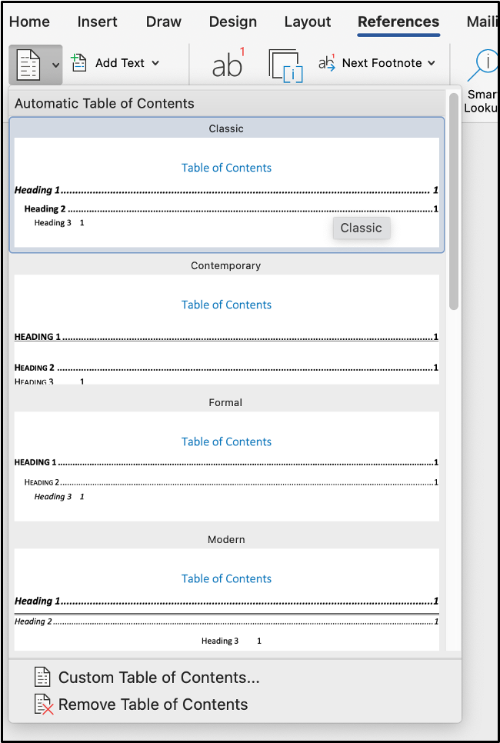
- Select Table of Contents. An Automatic Table of Contents pane should appear.
- Choose your preferred style.
Edit the Table of Contents
- Navigate back to the References tab.
- Select Table of Contents.
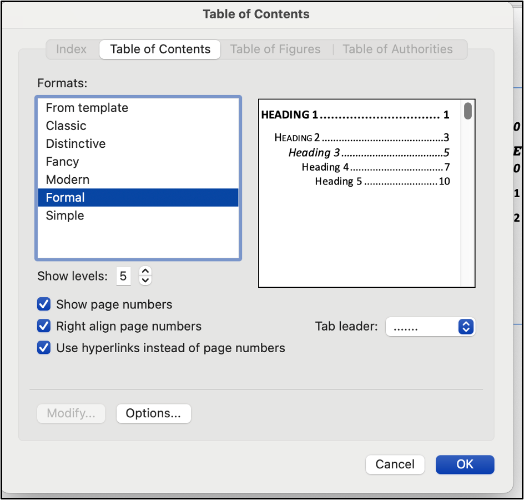
- Select Custom Table of Contents from the Automatic Table of Contents pane. A Table of Contents editor pane will appear.
- Set the style format.
- Choose how many levels the Table of Contents should show. This refers to the heading levels.
- Select if you want the numbers to be internal hyperlinks.
- Select OK to apply these changes. A new Table of Contents should generate.
The reading order determines the order that a screen reader will read out content.
Video Tutorials
- Creating Accessible Headings in Microsoft Word (18:57) - see timestamp 9:19 for information on the Navigation pane.
Navigation Pane
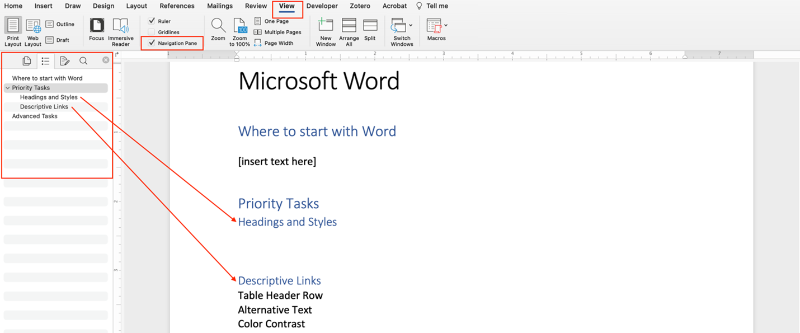
In Word, the Navigation Pane can be used to check reading order, reorganize document parts, and browse document content. The Navigation Pane displays a hierarchical list of headings and pages that essentially serves as a visual outline of your document.
Launch the Navigation Pane
- Navigate to the View tab.
- Check the box next to Navigation Pane.
- The Navigation Pane will open on the left.
Using the Navigation Pane
- Click on any of the headings in the Navigation Pane to go to that section.
- To re-order your content, drag the headings up and down in the navigation pane
Run the Accessibility Checker to test for accessibility issues. This checker scans your document for potential issues that might prevent people with disabilities from accessing the content properly. It will highlight the issues, provide suggestions on how to fix them, and then prompt you to fix these issues.
Video Tutorials
- Check Accessibility in Microsoft Office (4:52)
- Microsoft Support: Check the Accessibility of Your Document (1:10)
- Microsoft Support: Inspect Files for Accessibility (1:25)
Launch the Accessibility Checker
- Navigate to the Review tab.
- Select Check Accessibility.
- The Accessibility Assistant pane will open on the right.

There are several ways to convert Microsoft Documents to a PDF, but not all ways preserve the accessibility of the original document in PDF form. When saving your Word document as a PDF, avoid the Print to PDF option. This option only translates information you would see on a printed page. It strips the document of all metadata, links, bookmarks, and heading structures. Opt for the Save as PDF option instead.
Demonstration: Word to PDF
Watch TTaDA's Introduction to Exporting Word Documents to PDFs.
Resources
Explore the following resources to strengthen your skills in creating accessible Microsoft Word documents.
- TTaDA course: Digital Accessibility for Teaching and Learning
- TTaDA Recording (On-Demand Training): Word Document Accessibility 101
- Microsoft Support Article: Create Accessible Word Documents
- Deque University (On-Demand Training):
- Infobase (On-Demand Training): Making Word Documents Accessible (2025)
- Section 508 Video Trainings: How to Make an Accessible Document in Microsoft Word
UND Branded Template
Use UND-branded, accessible templates to maintain consistency. UND offers a variety of Word templates, each tailored to fulfill a specific purpose.
